A budget-friendly DIY & lifestyle blog

Wednesday, January 23, 2013

Houzz: Sew A Pair of Easy Sag-Top Curtains

I teased you guys earlier this week when I shared my new living room curtains with you.  Well, as promised, here's the tutorial for all of you who want to make your own or are just curious how it was done.  By no means am I a skilled seamstress....more of a fly by the seat of my pants and hope things work out type.  Luckily I have my Nana to help me wrap my head around projects.  Skills or not, these curtains are sooo easy to make.  And for all of those "I like the curtains better longer" folks:  Yes, I know that these are rocking the high-water style, but I'd rather have a set of curtains than a pile of threads.  For some reason our cat won't mess with them at this length, but when they are to the floor they get destroyed. 


For all the tips and tricks for making your own, check out the full tutorial on my latest Houzz Ideabook.


I'm still in awe how much these curtains transformed our living room.  It feels like a different space altogether and all it took me was an hour's time, tops!

So what do you use to transform a space?  Paint, textiles or both?


SHARE:

Friday, January 18, 2013

Saggy Never Looked So Good

With the living room looking so lovely and organized I finally got motivated to break out the sewing machine and check off a fun project off my ever-lengthening to-do list.  I've been on the hunt for some fabric to make roman shades for the kitchen and breakfast nook and have been having one hell of a time finding the perfect fabric.  I thought I had found just what I was looking for - white or off-white linen fabric with a colorful floral design - and picked up the Covington Wilmington Multi fabric, which is a vibrant paisley linen blend from Online Fabric Store during their Cyber Monday sale for $13.99/yard and free shipping (it's currently selling for $17.95/yard.) 

Four yards of fabric arrived at our doorstep a week or so later.  I was so excited to get started on the roman shades so I ripped open the package and pulled out the fabric.  In the five seconds that it took to take it in I knew that it would be perfect for the living room.  Yes, that's right.  The living room.  So, I guess it's back to the grind on finding fabric for the kitchen, but at least I found the perfect fabric for one room in our house.  The full DIY on how I made these simple sag-top drapery panels is on its way via Houzz, but I couldn't help but share a few photos with all of you....and if you're following me on Instagram, you probably already saw the sneak peek.

Here's what the room looked like after it got an organization overhaul.  Pretty organized, but definitely lacking in personality.


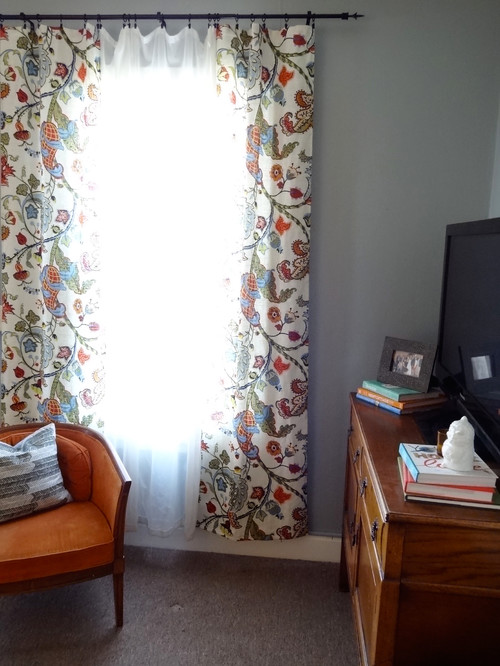
And here's what it looks like with a pair of beautiful sag-top drapes flanking the window.
SHARE:

Tuesday, December 25, 2012

Say Merry Christmas With A DIY Personalized Mug

First off, Merry Christmas!  I hope you all are enjoying some quality time with your families.  After all that has happened it's these little things, time spent with family and friends, that seem so important.  So cuddle up, stay up a little later and cherish every moment.

This quick and simple DIY gift is perfect for the coffee lover in your family or any last minute gift giving.


I know I'm not the first one to venture into sharpie drawing craziness (my neighbor made some adorable stick figure mugs for her Mom), but I thought I'd share this easy DIY gift idea, anyhoo.
SHARE:

Tuesday, November 20, 2012

Cleaning the Fridge // DIY Kids Magnet Organization

Ever have a pet peeve that is pretty ridiculous? But then again, isn't that exactly what pet peeves are?  Something very inconsequential that no matter how much you tell yourself that it really isn't a big deal it still seems to drive you bat shit crazy.  I have quite a few - probably more than any person should have.


Our fridge has been covered with little alphabet and farm animal magnets ever since our little man could crawl.  And by covered, I mean COVERED - the front and side.  They fall off or are thrown on the floor during one of Luke's godzilla-esque rampages.  And.It.Drives.Me.Nuts.  Instead of just saying forget it and donating them to another household I've suffered through for the sake of my kid's entertainment.  Not anymore, folks.
SHARE:

Friday, November 16, 2012

Can You Smell That Smell - Homemade Room Spray

Febreeze, move on over - there's a new, healthier girl in town and folks, she's easy.  If you can shake it - you can make it. 


You'll need:
  • 2 cups distilled warm water
  • 2-3 drops essential oil
  • 1 tsp baking soda
  • Spray bottle
First take some distilled water - you can either purchase some at the store, make your own or try the lazy girl's version (like me!) and just use cooled boiled water - pour it into the spray bottle and mix in the rest of the ingredients.  I've used lavender essential oil, but you could use whatever fragrance your little heart (or nose) desires.  Give it a good ol' shake and freshen your room or furniture items with a little spritz.


SHARE:

Monday, June 4, 2012

DIY // A Vintage Clock Update

I seriously love paint.  There's nothing easier than taking a "seen better days" piece and giving it a fresh update with a little paint.  And that's exactly what this project took.

You might have remembered this whimsical vintage mid-century modern Bill Miller Etc (Melrose Ave Los Angeles, Ca) clock from one of my past thrifting excursions.


It didn't need much, just a cleaning, a little sanding and a fresh coat of paint.  I taped off the glass on the front and the back panel to protect the label and then I started thinking paint.
SHARE:

Monday, April 30, 2012

Knockoff // DIY Glass Bottle Lamp

I've been such a procrastinator lately.  I've had all the supplies to make this lamp but just haven't gotten around to it.  And it's another one of those 30 second projects, like The World's EASIEST DIY Laundry Bag, that had me wondering why I had put it off so long.


I was inspired by these gorgeous Eva Colored Glass Table Lamps {$99} from Pottery Barn.
SHARE:

Friday, April 27, 2012

DIY // A Budget-Friendly and Quick Bathroom Makeover

I'm in a "lots of jobs started and not a single one finished" rut.  I'm still in the process of painting the accent wall {if you've liked me on Facebook then you've already seen some work in progress photos and if not, you'll just have to wait to see the big reveal}, which means the open shelving and trim have to wait and the hubs is still working on mounting the microwave and putting up the window trim since the nice weather has allowed him to work on the foundation beam and mudroom flooring.  With all these left-undone projects hanging over our head, I've been getting a little ants-in-my-pants anxious about getting something done.

The kitchen was out of the question.  I mean, I could have worked on the accent wall some more but I just couldn't bring myself to wrap my now-arthritic fingers around that damn paintbrush and paint the same form over and over.  A quick project was in order.  One that would go from Before to After in a matter of hours and not get stuck in that awful During trap.  The bathroom was the perfect small space where, with a few quick changes, I could transform it from Blah to Ahh...in under an hour.

SHARE:

Wednesday, April 18, 2012

The World's EASIEST DIY Laundry Bag

Have you ever wanted to make something but don't really want to put in the time that it usually takes a project to get completed?  Well, do this.  It's practical, cute and INCREDIBLY EASY!  All the hard work is already done for you and all you have to do is pick out a cute pillowcase and some corresponding ribbon.


I first stumbled upon this on Better Homes & Gardens.  I saw it, loved it and pinned it.  Then it sat on my board, nearly forgotten, until I was choosing a project for the Pinterest Challenge: Winter Edition but the Tin Can Man won out, so still it sat, uncompleted.
SHARE:

Tuesday, March 20, 2012

Kids Crafts: DIY Foam Animal Masks

We're headed to the Oregon Zoo in a couple weeks.  I love experiencing the zoo with kids.  They're just so excited and so in love with every single animal.  I don't love the expensive gift stores, though.  So, to ward off the wallet-busting trip I made these adorable and inexpensive animal masks which could take the place of any of the expensive crap sold at the gift store.  While my boy was a little too young to help out, this would be a perfect craft to share with your kids.


SHARE:

Wednesday, March 14, 2012

Pinterest Challenge Winter Edition: Tin Can Man

As I mentioned before, I'm at it again ~ it's Pinterest Challenge - Winter Edition time where all us Pinners finally start doing and stop pinning, for a little while at least. Thanks to the ladies over at Bower Power Blog,  Young House Love,  The Great Indoors and Hi Sugarplum for lighting the fire under all of us!

For those of you that aren't following me on Pinterest (and how dare you!) I have pins upon pins of awesome projects I want to complete, but this one beat out all the rest to become my Challenge project. And the reason?  I have been wanting to make one for YEARS.  But with no yard of our own, I just didn't see the point and never got around to it.  Until now!  I'm so happy to have our first piece of yard art.  Drum roll please....

Please allow me to introduce, Mr. Fancy Shoes.
{Anyone that can sport gold shoes is pretty awesome in my book.}

SHARE:

Sunday, February 12, 2012

14 Days of Valentines: Day 13 Handmade Valentine Cards

It's day 13 of 14 Days of Valentines, my attempt at one Valentine's inspired craft each day.


Here's two handmade valentine cards that only required paper, glue and scissors (oh, and that googly eye.)  Pretty inexpensive and pretty darn cute!


I Only Have "Eye" For You Monster card.
SHARE:

14 Days of Valentines: Day 12 Paper Heart Bookmark

It's day 12 of 13 Days of Valentines, my attempt at one Valentine's inspired craft each day.


The hubs and I both share the reading bug and we NEVER have a dedicated bookmark to save our spots.  (We're not really corner folders...we love our books too much.)  I've found myself using the closest thing I can find to save my page...like an Amazon gift card, someone's business card, a stray piece of paper, or a tissue (clean, of course!)

Well, not anymore!  We've got our very own set of colorful heart shaped corner bookmarks.


SHARE:

Friday, February 10, 2012

14 Days of Valentines: Day 11 Stamped Heart Card

It's day 11 of 14 Days of Valentines, my attempt at one Valentine's inspired craft each day.


For day 11's project I repurposed a champagne cork into a heart shaped stamp and, with the help of my little man, made some cards and wrapping paper.  A very simple project, but one that won me over and I can't decide if it was due to having a handsome little helper or the bubbly.


I absolutely love champagne and sparkling wine.  I could drink it every single day.  (Don't worry, I don't.) 
SHARE:

Thursday, February 9, 2012

14 Days of Valentines: Day 9 Love Those Hands Sugar Scrub

It's day 9 of 14 Days of Valentines, a countdown to Valentine's Day one craft at a time.


After all this crafting, my hands are beat!  It's time to show these creative geniuses some love.  This Lemon Sugar Scrub is the perfect cure to get my hands back to perfection (Minus the lack of fingernails.  Sadly, I'm back to my ol' biting habit.) Making your own sugar scrub is inexpensive, incredibly simple and it gives you the same beautifully soft results (without any harmful chemicals), so you won't have to make those wildly expensive beauty purchases anymore...well, at least in the sugar scrub department.


Lemon Sugar Scrub Ingredients:
  • 2 cups Sugar
  • 1 cup Olive Oil
  • 4 tbsp Lemon Juice (or you could use an essential oil)
Mix all ingredients together and store in your desired container.  Mine is a vintage Le Parfait french canning jar.  Yep, a goodwill find!

Day 9 down, 5 to go!


SHARE:

Wednesday, February 1, 2012

14 Days of Valentines: Day 1 Coffee Filter Flowers

This is Day 1 of 14 Days of Valentines, a countdown to Valentine's Day one craft at a time.


Love the look of fresh blooms, but hate the whole wither & die aspect of them?  Lacking a valentine or have one that drops the ball on the whole flowers bit?  Here's a simple craft to make your own blooms that are guaranteed to last.  Now, if you miss the sweet fragrance of fresh flowers ~ try this with your favorite dryer sheets!


Supplies:
SHARE:

Saturday, January 28, 2012

DIY // Transform Ugly Thrifted Ceramic Owls

Hey there, Vamps!

Have you all noticed the trend of white ceramic owls?  I know what you're thinking, "Oh, God, NOT ANOTHER ceramic owl!  Seriously, everyone and their mom has one, but not me.  I have two!

West Elm Ceramic Owls

 Here's how I took two thrift store ceramic owls from trash to treasure.  (Break out that spray paint and start spraying.  It took me 3 coats.)


So, what about you?  Do you still fancy the white ceramic owl or are you sick and tired of the trend?


SHARE:

Thursday, January 5, 2012

DIY // A Simple Chalkboard Update

Here's a quick re-do project that took all of 5 mins (not including drying time.)

I snagged this small chalkboard at goodwill a few weeks back and gave it a quick update with some green paint around the frame.

It was still looking a little beat up, so I taped off the sides and gave it three coats of spray-on chalkboard paint to freshen up the surface.  Doesn't it look so much better?


What quick, little changes have you done that made all the difference?

SHARE:

Monday, December 12, 2011

DIY // How To Make Felt Mistletoe

In need of a reason to spread some holiday love?  Well, why don't you make yourself a felt mistletoe, camp out under it and get all the kisses your little heart desires?  Sounds like a good plan to me.


This project first caught my attention on Pinterest and for some reason I've put it off until now.  Silly, me.  For Green Wedding Shoes' tutorial click here.  Otherwise, just scroll down to see how I did it.

Supplies:
SHARE:

Sunday, December 11, 2011

DIY // Handprint Christmas Tree

Nothing gets more handmade than a HANDprint project.  Am I right?  And what could make this project even better?  The addition of friends & food!  (Thanks, ladies!)

I first spotted this project on Pinterest and have been so excited to make one for our little family.  I was able to finally track down the original posting at The Other White House after traveling through many a'blog (it is a very popular project!)  The Other White House has a great little tutorial and mad props go out to Heather for sharing the wonderful idea!

So, on to the project...

The Supplies:
  • Brown, Yellow, Green Paint (I used Tempera)
  • Canvas (Any size will do.  I used 12x16)
  • Foam applicator
  • Small craft paint brush
  • Hands (Hopefully still attached to the owner...gross.)

SHARE:
© Revamp Homegoods. All rights reserved.
Blogger templates by pipdig
09 10 Code line 7 9 is for loading jQuery library. Remove this line if you’ve already loaded it somewhere else in your blog. Hint: If your blog has an image slider, carousel or something with fading effect running, chances are it is powered by jQuery. If this widget doesn’t work, the first thing you want to do is comment out or remove this line. To use your own button, replace the URL in line 3 with the direct link URL to the image. Make sure to keep the quotes. To reposition the button, replace