A budget-friendly DIY & lifestyle blog

Monday, February 4, 2013

Clean It Up: All Natural Homemade All-Purpose Cleaner

All the organizing and cleaning during the January Cure had me going through my cleaning products like wildfire.  Luckily I make my own all-natural homemade cleaners which are healthy and inexpensive.  I've already shared my recipes for liquid laundry detergent, powdered laundry detergent and lavender room spray.  In addition to those great cleaners, I also use an all-purpose spray to get all my surfaces sparkling clean.  Like all cleaners - you can add essential oils to give your home a fragrant boost.


All-Purpose Cleaner:
  • 28 oz spray bottle
  • 3 tsp. borax
  • 1/2 tsp. liquid castille soap (like Dr. Bronner’s)
  • hot water
Mix all together in the spray bottle then shake what ya mama gave ya.  This cleaner is safe on all surfaces and works great.  I used it on some tough stains (FYI:  coffee and unsealed grout Do.Not.Mix.)  Not to mention, it smells great!

So are you a loyal commercial brand cleaner or have you dabbled in some homemade versions?  What's your favorite?


SHARE:

Thursday, January 24, 2013

Traditions Worth Keeping: Family Yearbooks

For some reason I really like thinking of fun little traditions our family can take part in, (like Christmas in July!), but the executing of these said traditions is a whole 'nother story.  On Fridays I suggested we take part in Family Game Night - problem is...I kind of, sort of, don't really like playing games.  It's not the games, it's me.  I'm just so tired of winning - I'd rather cuddle up on the couch, scarf popcorn and watch movies.  The other two men in my family love games, so I'm sure a compromise is in order.  Then I created a date night jar and a bucket list, both of which have only been used once. While many traditions in this household have been abandoned along the way there's one tradition in our household that we've kept around.


I hinted at these yearbooks when I was organizing the tv cabinet.  Each year I make a Padgett Family Yearbook which highlights the past year's travel and activities in photos.  We have 8 books and counting (fingers crossed.)  The first one starts during our dating adventures, which began in 2005, then fast-forwards through 2006 because this girl went a little crazy and suffered from a bout of commitment-phobia.  But don't fret, things resumed in 2007 and have been going strong ever since with couple extra additions that have made their way into our stack - like our wedding album and one dedicated to our little man.
SHARE:

Wednesday, January 23, 2013

Houzz: Sew A Pair of Easy Sag-Top Curtains

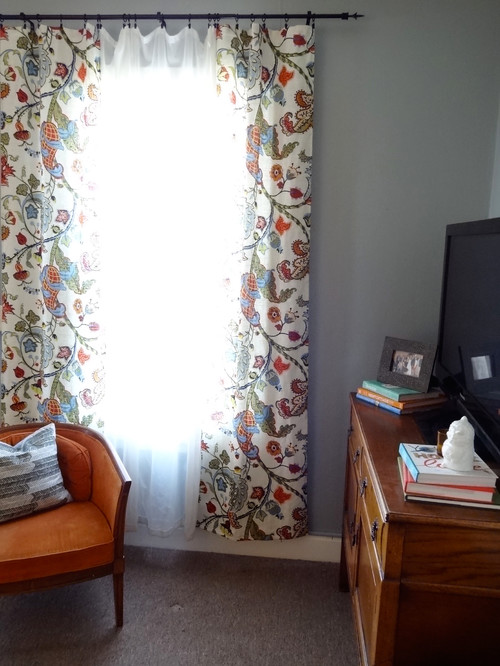
I teased you guys earlier this week when I shared my new living room curtains with you.  Well, as promised, here's the tutorial for all of you who want to make your own or are just curious how it was done.  By no means am I a skilled seamstress....more of a fly by the seat of my pants and hope things work out type.  Luckily I have my Nana to help me wrap my head around projects.  Skills or not, these curtains are sooo easy to make.  And for all of those "I like the curtains better longer" folks:  Yes, I know that these are rocking the high-water style, but I'd rather have a set of curtains than a pile of threads.  For some reason our cat won't mess with them at this length, but when they are to the floor they get destroyed. 


For all the tips and tricks for making your own, check out the full tutorial on my latest Houzz Ideabook.


I'm still in awe how much these curtains transformed our living room.  It feels like a different space altogether and all it took me was an hour's time, tops!

So what do you use to transform a space?  Paint, textiles or both?


SHARE:

Tuesday, January 22, 2013

Home Organization: Living Room Chapter 2

Continuing on my quest for a more organized and all-around more relaxing home, I hit the living room for the second time.  With the eastern side of the room cleaned up it was time to hit the western half. Since I had already picked up the toys and books, plus cleaned up the sofa - this side of the room was pretty well organized.  What it was lacking was any sense of style or personality - just like the east side of the room before the addition of the vibrant draperies which are intentionally rocking a high-water style and the throw pillows.


Since I moved the large map from the large wall to the mantle (which seems to work better) the wall is back to being a large blank wall.  I didn't tackle that bare space, but I did work on the wall to the right of the fireplace.

SHARE:

Monday, January 21, 2013

DIY: Sew Your Own Simple Pillow Cover

Creating a room that feels put together and cohesive is every homeowner's dream. Paint, drapery and decor are each important to the overall design and feeling in a space. Throw pillows - a great accessory to achieving this well-rounded look - can add a burst of color, texture and personality and are a great way to play with patterns and colors. Beautifully covered pillows are easy on the eyes, but perhaps not so much on your pocketbook.


Using leftover
Covington Wilmington Multi fabric from my drapery panels, I made two envelope-style throw pillows. These envelope-style pillow covers are the perfect use of leftover fabric giving my simple navy sofa a boost of color and pattern. They can easily be removed for cleaning or just to change-up the decor.


Materials/Supplies:
SHARE:

Friday, January 18, 2013

Saggy Never Looked So Good

With the living room looking so lovely and organized I finally got motivated to break out the sewing machine and check off a fun project off my ever-lengthening to-do list.  I've been on the hunt for some fabric to make roman shades for the kitchen and breakfast nook and have been having one hell of a time finding the perfect fabric.  I thought I had found just what I was looking for - white or off-white linen fabric with a colorful floral design - and picked up the Covington Wilmington Multi fabric, which is a vibrant paisley linen blend from Online Fabric Store during their Cyber Monday sale for $13.99/yard and free shipping (it's currently selling for $17.95/yard.) 

Four yards of fabric arrived at our doorstep a week or so later.  I was so excited to get started on the roman shades so I ripped open the package and pulled out the fabric.  In the five seconds that it took to take it in I knew that it would be perfect for the living room.  Yes, that's right.  The living room.  So, I guess it's back to the grind on finding fabric for the kitchen, but at least I found the perfect fabric for one room in our house.  The full DIY on how I made these simple sag-top drapery panels is on its way via Houzz, but I couldn't help but share a few photos with all of you....and if you're following me on Instagram, you probably already saw the sneak peek.

Here's what the room looked like after it got an organization overhaul.  Pretty organized, but definitely lacking in personality.


And here's what it looks like with a pair of beautiful sag-top drapes flanking the window.
SHARE:

Thursday, January 17, 2013

"Only Fish In The Sea" Art

I'm not digging the art behind the couch.  I think it's the map.  I have a plan for something new so the frames that were hanging are now up for grabs.  I have this long 5 photo frame that we had family photos in and then it housed some typography art for the holidays.  I took it down a few days ago and set it across the room.  There it sat - taunting me.  Daring me to make something to put into it.  And so I did.

You ever have those moments where an idea just hits you and you're like...Hells Yes!?  This was one of those times.


I love this simple art - a fishing pole, a pond...
SHARE:

Wednesday, January 16, 2013

DIY Driftwood Mirror

This project gets filed under ABOUT TIME!  I've been wanting to revamp our entry mirror with driftwood since it was hung.  After seeing this and this I was even more motivated.  So motivated even, that back in August I went on a successful hunt for driftwood and brought back a large assortment of all different sizes and shapes.


With a few pieces glued down I started to have second thoughts about the adhesive I was using (slow drying time and pretty stinky) which was leftover from my Driftwood Chalkboard project.  Then unmotivation set in.  (A word?  Probably not.)  I removed the few pieces of driftwood that I had glued, hung the mirror back up and all of a sudden sunny August turned into dreary January.
SHARE:

Tuesday, January 15, 2013

Home Organization: Living Room Chapter 1

Last week our house-wide organization extravaganza began with the kitchen cabinet and moved on to the bathroom cabinet and hallway closet.  If you think that's all our little house needed to get in tip top shape then you be crazy!  Our house is out of control and there's not one room - let alone one corner - that doesn't need some attention, so I'm hitting one place at a time and moving throughout the entire house.

My next battle was against the side of the living room nearest the entry door, which is visitors' first impression.  The trouble spots is a chair and two cabinets - our tv stand and our entry cabinet.  Unorganized is a understatement.  The tv cabinet holds our dvds, cable box and blu-ray and the drawers are a mix of junk that we just shove in there because we don't want to take the time to find a more appropriate place for it.

This guy is the main offender.  Really, ever since we moved from Seattle in 2010 we haven't utilized it - we stuck a bunch of random things in there to move and that's where they stayed.  It's full of useless papers, things we don't use and don't plan on using and god knows what else.


I worked through the cabinet one drawer at a time.  I used a trash bin, a bag for donations, a bag for things to keep that needed to find new homes and our home filing box to organize through the clutter.  I was amazed and a little embarrassed at the random junk we were hanging on to.
SHARE:

Monday, December 24, 2012

Hang Your Stockings By The Fire...Or Not!

Christmas stockings conjure thoughts of joy and cheer as soon as you see them, making them a great and easy addition to holiday decor. Tradition touts, "Hang your stockings by the chimney with care." But luckily, those without a fireplace or mantel — or those wanting to break with tradition — have many options for hanging up their stockings this holiday season.  

From a branch.   Use a natural element, like a branch or a piece of driftwood, in your holiday decor by mounting it on your wall like Jaime from CraftyScrappyHappy has done here. Stockings can be hung using colorful ribbon.


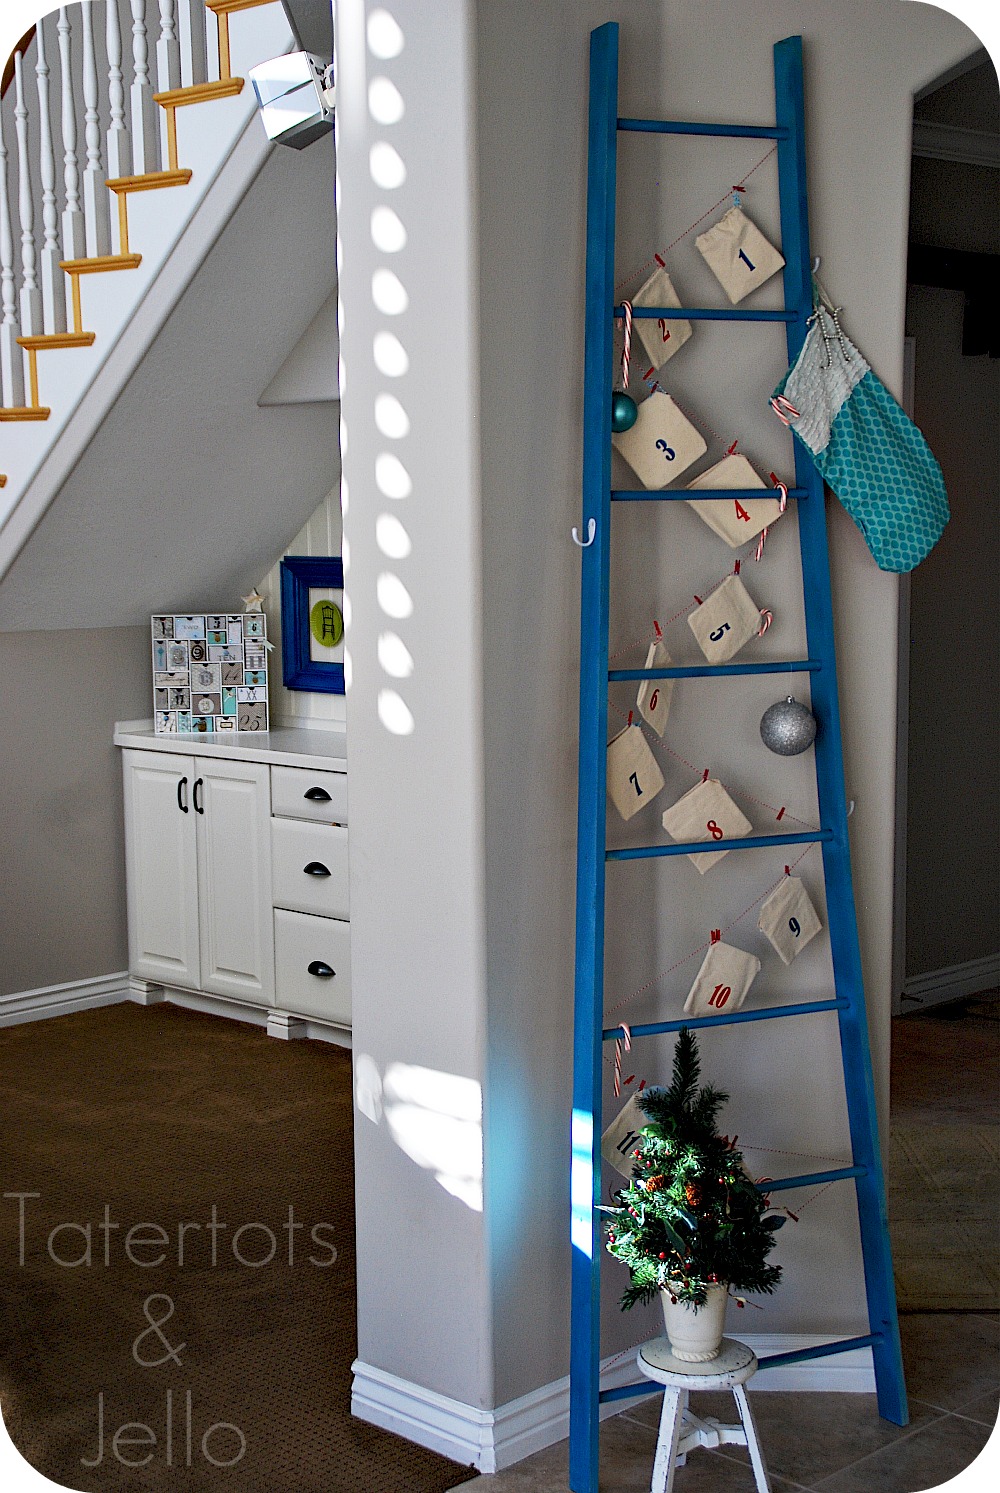
On a ladder. Whether your style is modern or rustic, you can find a ladder for either and everything in between. Haven't been able to find the perfect ladder? Make your own, as Jenn has done here.


For the entire list of unique places to hang your stockings which features bloggers like the two amazing ladies above, plus even more suggestions in the comments section, check out my latest Houzz Ideabook.


Are you sans mantle?  Where do you hang your stockings?


SHARE:

Tuesday, December 4, 2012

Maximizing Storage By Utilizing The Space Above The Fridge

Our love for open shelving is overflowing.  In addition to the two shelves in our kitchen, which hold our white dinnerware and glass storage jars, we've added two more above the fridge.  Every extra bit of storage is needed with a couple of clutter-hounds like us and utilizing the space above the fridge was a no-brainer.


The top of the fridge typically looks like this - an eyesore if ever there was.  I removed everything and gave it a good cleaning which is something that tends to get overlooked.  Do you guys regularly wipe down the top of your fridge?


SHARE:

Monday, December 3, 2012

Kitchen Door Trim...Finally!

Back a few weeks ago, when we were replacing windows in the bathroom and mudroom, I finally tackled a project that we've been needing to finish.  While the boys were framing the new window openings, I stole the nail gun for a couple projects - putting trim on the open shelving and putting the trim back up in our doorways.


The trim has been off since we started our kitchen remodel.  I can't really say why it's taken us so long to put it back up, probably just laziness.  I mean swinging a hammer is really hard work.  With access to a nail gun I finally had the motivation to get 'er done.  Unfortunately I have few photos of the process, but it went a little something like this...
SHARE:

Tuesday, November 13, 2012

Open Shelving Gets A Trim

Remember that open shelving we installed awhile back?  We made the 4-foot long shelves from the Ikea Valter brackets and simple 1x12 white wood boards.  I love our open shelving.  It's freed up cabinet space where we used to house our plates and bowls and cleared up counter space where our glass jarred food staples used to hang out.  But what I'm not too fond of are the thin boards and the unfinished edges of each shelf.


While the boys (the hubs, my dad and my brother) were hard at work on the mudroom and while we had all the tools out, I garnered some motivation (and possibly guilt over being the only one not doing anything) and decided to finally get these shelves up to par with a quick little fix.  I pulled out a couple 1x2s from our stash to update each shelf with mitered trim.  The 45 degree miter cuts were incredibly simple thanks to the use of a chop saw, but they could also be cut using a miter box and hand saw.  I cut three trim pieces for each shelf and left the back of each trim-free since they wouldn't be seen.
SHARE:

Friday, November 9, 2012

Mudroom Update and Inspiration

Have I told you how much I love mudrooms?  They're a perfect place to drop your boots, toss your jacket and leave every trace of mud and rain behind.  As I'm more partial to finished mudrooms as opposed to unfinished - we're gearing up to work on ours this weekend.  When we bought our home the room wasn't too bad and we saw all the potential it had.  We thought it'd be a quick update with a new door and window, but this was one of those rooms that had an unwelcome surprise around every corner.


From the rotting foundation beam and subfloor to the scary electrical and plumbing work - this room has definitely been a headache. It's been in a state of limbo and disarray for the past 6 months after we put in the new door and replaced the subfloor.  Our mudroom has come a long way but it still has a long way to go.
SHARE:

Tuesday, November 6, 2012

The Paint That Cured The Itch

Not THAT itch.  Thank god.  My itch is a little more mental.  There are so many pending projects around the house that it's feeling a bit overwhelming and with our budget cut it seems that nothing is going to get done.  This lack of progress has me in a bit of a funk and if you've noticed I haven't been up to much on this ol' blog (which is now one year old) and that's a bit scary.  If I'm dormant for too long - watch out!  I get that itch to get creative and who knows what'll happen.  This time around wasn't too drastic, but the final results did sway from my originally intended design scheme just a bit.

My plan was to paint all of the living spaces (i.e. the living room, hallway, stairway, landing, etc.) a light warm gray covering up the off-white that is painted everywhere including the trim and ceiling.  I swear they just moved through the whole house with a paint sprayer and no surface was safe!  (Sounds familiar, Pops?)  Yes, gray.  Just like everyone else.


I like gray.  No, I love gray.  If you're a Pinterest follower then I'm sure you're well aware of my love of gray.  It's a perfect neutral and is both modern and traditional.  It's perfect for our young little family and our little coastal cottage. BUT, my warm gray color would be a new purchase.  One that I don't really think I could rationalize to my hubby which means that I'd have to live with these hideous off-white walls for whoever knows how long.
SHARE:

Wednesday, October 17, 2012

Knockoff // DIY Anthropologie Zinc Letter

Remember when I picked up an Anthropologie zinc letter J from a local thrift store?  I hung it on Josh's side of the bed and kept my fingers crossed that I'd score a letter M for my side because I sure as heck wasn't going to pay $18 at Anthropologie.  Instead of just sitting around wishing and praying for a deal, I thought I'd take fate in my own hands and make an inexpensive and simple copycat version of the beautiful zinc letters.


I picked up an MDF letter ($4.99) and
SHARE:

Monday, October 8, 2012

DIY // Hanging Bathroom Storage Baskets

Our small bathroom lacks in the storage department.  We have a builder's grade vanity that houses lots of our essentials but more is always needed.  After stumbling upon some wall storage using ikea bygel rails and baskets I decided to make my own and mount them right outside the bathroom door.

The idea is a great one - my execution of it, not so much.  Not only is it messy and unorganized, but our little monster has a fascination with lotion and will do anything to get his little paws on it.  Having it out in plain sight is both an eyesore and a temptation our little two year old can't shake.


SHARE:

Wednesday, October 3, 2012

DIY // Update Your Kitchen Lighting on the Cheap

It's only taken 9 months, but we have finally replaced our ugly boob lights in the kitchen.  Can I get a woot woot!

I know some of you are thinking what's wrong with boobs?  EVERYTHING if you're talking about lighting. I consider these builder's grade flush-mounted lights the Achilles heel in room design. We have at least one in every room of our home. Our kitchen boasted three — one in the center of the room, one above the sink and one in the nook. We knew we needed to replace them and the center light and the one above the sink were the first to go.


We tackled the first light back in May.  We picked up the IKEA Alang light {$39.99} for its simple style its neutral color and its woven texture.  We were a little nervous going into it since we had never installed a light before, but luckily those helpful DIY'ers over at Young House Love posted a how-to a few days after we picked up our light.  {Thanks guys and perfect timing!}  It was a really simple update that I am so happy with.
SHARE:

Monday, October 1, 2012

So Bright You've Got to Wear Shades

I don't know what it is about choosing fabric but it absolutely terrifies me.  You guys with me on this?  The thought of making the wrong choice sends me straight into panic-attack mode.  I'm sure it has to do with my  decorators remorse where, as soon as I make that final choice and purchase/make whatever item, I see something that I think would have worked better.  It's like the iphone curse - as soon as you buy that new model - a newer & better version comes out.

I went on the hunt to find fabric for some roman shades for the windows in our kitchen and breakfast noo.  I wanted something bold and graphic - with no actual color scheme in mind although one seemed to emerge.

Amy Butler Daisy Chain Wildflowers in Turquoise

Taza Gray and Aqua
SHARE:

Tuesday, September 25, 2012

11 Fascinating Faceted DIY Projects

Hey there!

I'm on a faceted kick.  Maybe it's because school is back in session and my husband is up to his elbows in geometry lesson plans or maybe it's just the simple fact that I like the surprising use of texture and shape. Either way, I've got it bad.

What's faceted you ask?  Simply put, it means having many non-parallel surfaces.

I first stumbled upon this faceted pendant lamp and have been in the process of making my own but that process has been stretched out weeks upon weeks.  My choice between making a million little cootie catchers or just lazily sprawling out on the sofa to watch some garbage tv (my favorite kind) has been a bit one sided as of late.


Not only have I been gaga over this lamp, but I've been coveting some origami art in my husband's classroom.  It's been hard not to just slip a few of the best pieces into my bag when we're sharing lunch.  I suppose I could just make my own, but first I'm thinking about busting out all of these beautifully crafted projects.
SHARE:
© Revamp Homegoods. All rights reserved.
Blogger templates by pipdig
09 10 Code line 7 9 is for loading jQuery library. Remove this line if you’ve already loaded it somewhere else in your blog. Hint: If your blog has an image slider, carousel or something with fading effect running, chances are it is powered by jQuery. If this widget doesn’t work, the first thing you want to do is comment out or remove this line. To use your own button, replace the URL in line 3 with the direct link URL to the image. Make sure to keep the quotes. To reposition the button, replace