
Wednesday, January 29, 2014
DIY // How To Steal Art For Your Home (And Not Get Caught)
No matter your budget there are ways to decorate your home to show off your personal style. It's obvious I'm a thrifting addict and I find tons of decor items and art at my local thrift stores. I'm also not against stealing, repurposing or even making art from scratch. Yes, I said steal but not in the "dress in all black slink into a museum and caper that Monet you've been coveting" way. Things like magazines, cards or finding free illustrations online are all fair game. Just take the art from our DIY industrial shelves for example.
Internet // The framed whale illustration I found online, printed on cardstock and stuck in a crate and barrel frame is one of my favorites. The camera print on the opposite shelf (scroll down for photo) which is another favorite is available online as a free download from Design Editor (as well as a photo of a vintage brownie camera.) Both can be printed up to a 24x36 inch print.

Tuesday, January 7, 2014
DIY // Wooden Alphabet Wall Art
Did you catch the boys' shared room tour a couple weeks ago? You might have caught a glimpse of my latest DIY project. I've long been a fan of letter decor in children's rooms. I've even pinned a few inspirations here, here and here. So it was only a matter of time before I tackled a project of my own.

I picked up the white 6" MDF letters, a staple gun and some velcro from Jo-Ann Fabrics and Craft Store. Each of the letters were on sale for half price and I used a coupon for the rest - grand total: around $60.
I picked up the white 6" MDF letters, a staple gun and some velcro from Jo-Ann Fabrics and Craft Store. Each of the letters were on sale for half price and I used a coupon for the rest - grand total: around $60.
Tuesday, December 31, 2013
DIY // Budget-Friendly Industrial Wall Shelving
There's no better way to wrap up a whole year than with one final DIY project. When we first walked through our house there were a few changes that we knew we'd be making; opening up the mudroom to the kitchen and adding bookshelves around the fireplace. Two years later and we can proudly report that we've finally knocked both off our to-do list.

This update was budget-friendly and simple to build, plus it totally transformed our living room. I picked up the supplies from Home Depot for less than $130 and broke out my trusty 3MDIY supplies to get started.
This update was budget-friendly and simple to build, plus it totally transformed our living room. I picked up the supplies from Home Depot for less than $130 and broke out my trusty 3MDIY supplies to get started.
Friday, December 27, 2013
Baby & Toddler // Kids' Shared Room Reveal
Luke and Callaghan's room is well on its way to being a finished space. The painted striped walls and painted chalkboard wall are still hanging tough but we made a few changes to make it more suitable for two kids. The addition of the DIY loft bed allowed us to open up some flooring space. If you remember from our children's shared bedroom inspiration post, we initially wanted to place the crib underneath but we just weren't comfortable with how tall the loft bed would have had to be. So we scrapped that idea and decided a play & work area underneath would be better all around.


Monday, December 23, 2013
DIY // Loft Bed Book Storage
We're a family of book lovers. Both sides of our family are readers which is one of the reasons why we fell in love - that and crosswords...and beer. We have boxes and boxes of paperbacks and hardbacks upstairs that are just waiting to come out of hiding once we build a couple of built-in shelves for the living room. It's not surprising, either, that our boys' room is overflowing with storybooks.
Reading is our one and only bedtime ritual that has stuck and now that Luke is getting older he's joining in on the action. After we read to him he usually insists on reading to us. He's got The Spooky Old Tree and SuperMan down pat and improvises pretty dang well on any other stories. After storytime is over he usually crawls into bed and falls asleep "reading" to himself.

To keep his favorite books close I added a little bookshelf to the inside of his loft bed using a Bekvam spice rack from Ikea. This spice rack is SUPER inexpensive (only $3) and is the same natural wood tone as the loft bed.
Reading is our one and only bedtime ritual that has stuck and now that Luke is getting older he's joining in on the action. After we read to him he usually insists on reading to us. He's got The Spooky Old Tree and SuperMan down pat and improvises pretty dang well on any other stories. After storytime is over he usually crawls into bed and falls asleep "reading" to himself.
To keep his favorite books close I added a little bookshelf to the inside of his loft bed using a Bekvam spice rack from Ikea. This spice rack is SUPER inexpensive (only $3) and is the same natural wood tone as the loft bed.
Tuesday, December 17, 2013
Small Space Solutions // A Makeshift Changing Table
Furniture that serves double-duty is key to getting the most out of a small space which is why there was no way I was going to purchase a changing table. Most of the time we're changing Cal in the living room but there are times where a designated place for changing in the bedroom comes in pretty handy.

The old blue dresser was replaced with this 7-drawer dresser which not only holds both boys' clothes but also is the perfect platform for a makeshift changing table.

Two inexpensive two-compartment wooden crates from Jo-Ann Fabrics and Craft Store keep all the necessities right at hand and the changing pad (with chevron cover) keep baby comfy and safe during diaper changes. I purchased my pad new because I couldn't find a used one, but for those of you that don't live in the boonies finding a used changing pad should be no problem. (They're gently used and have a plastic cover so you shouldn't have to worry about this used item for baby.)
The old blue dresser was replaced with this 7-drawer dresser which not only holds both boys' clothes but also is the perfect platform for a makeshift changing table.
Two inexpensive two-compartment wooden crates from Jo-Ann Fabrics and Craft Store keep all the necessities right at hand and the changing pad (with chevron cover) keep baby comfy and safe during diaper changes. I purchased my pad new because I couldn't find a used one, but for those of you that don't live in the boonies finding a used changing pad should be no problem. (They're gently used and have a plastic cover so you shouldn't have to worry about this used item for baby.)
Thursday, November 14, 2013
Thanksgiving Decor // Turkey Tablescapes
We're taking it easy over here for the holidays - something about a new baby and a busy three year old that leaves me little to no time or energy to really get down to crafting/decorating. I did manage to find a short little break to create this festive thanksgiving tablesetting for Jo-Ann Fabric and Craft Store's Celebrate the Season campaign - a perfect setting for that turkey and all those delicious side dishes.

I kept it simple with a brown craft paper table "cloth" which is inexpensive, customizable and a breeze to clean up. That homemade cranberry sauce sure is tough to get out of those linen tablecloths. All I did was cut off two lengths from a roll of craft paper. To get it to lay down along the sides, just run your finger along the edge of the table creating a sharp crease. I also folded the corners so they'd drape nicely.
I kept it simple with a brown craft paper table "cloth" which is inexpensive, customizable and a breeze to clean up. That homemade cranberry sauce sure is tough to get out of those linen tablecloths. All I did was cut off two lengths from a roll of craft paper. To get it to lay down along the sides, just run your finger along the edge of the table creating a sharp crease. I also folded the corners so they'd drape nicely.
Thursday, October 24, 2013
DIY // Faceted Table Lamp
What is a 9+ month pregnant lady who suffers from constant false labor pains to do to keep her from going crazy? Fold a thousand little fortune tellers of course.
This waiting around for baby to arrive is literally the worst part of pregnancy. I've always had contractions and some days they're just little annoyances and other days they're pretty strong and regular and then all just up and disappear. Most.Annoying.Thing.Ever. To keep from obsessing over every little sign of labor I set out to give a basic table lamp a fun textural update - inspired by this faceted pendant light project.

You'll need to make a crap ton of fortune teller origamis for this project. To start, you'll need square pieces of paper. Save your pennies and forget about buying origami paper - you can make your own out of cheap copy paper. I created (4) 4.25" squares from one sheet of paper. The easiest way to make this size is to cut off 2.5" from the long end of a piece of basic 8.5x11" copy paper - leaving an 8.5" square. Fold into fourths and cut - leaving four 4.25" squares.
This waiting around for baby to arrive is literally the worst part of pregnancy. I've always had contractions and some days they're just little annoyances and other days they're pretty strong and regular and then all just up and disappear. Most.Annoying.Thing.Ever. To keep from obsessing over every little sign of labor I set out to give a basic table lamp a fun textural update - inspired by this faceted pendant light project.
You'll need to make a crap ton of fortune teller origamis for this project. To start, you'll need square pieces of paper. Save your pennies and forget about buying origami paper - you can make your own out of cheap copy paper. I created (4) 4.25" squares from one sheet of paper. The easiest way to make this size is to cut off 2.5" from the long end of a piece of basic 8.5x11" copy paper - leaving an 8.5" square. Fold into fourths and cut - leaving four 4.25" squares.
Thursday, October 10, 2013
Spooky Spaces // A Halloween Mantle
I'm not one to go all out for the holidays and decorate every room in the house, but I do like to update the mantle from time to time. Using a budget-friendly combination of crafty projects and home decor pieces I already own, Halloween is one of my favorite holidays to change things up. So, when Jo-Ann Fabrics and Craft Stores contacted me to participate in their Celebrate the Season campaign, I jumped at the chance and created a spooky Halloween inspired mantle fit for any sinister character.

All it took to transform my everyday mantle into a spooky space was a quick trip to my local Jo-Ann Fabrics and Craft Store for supplies to create a simple craft and a couple additional Halloween decor items, plus a few more pieces I already had laying around the house.
The Holiday Decorations Spider Web Mantle Scarf, Martha Stewart Happy Halloween Banner, paper-mache witches hat and paper-mache tombstone were each on sale at Jo-Ann's and only ran me a total of $14.26. Not too shabby!

All it took to transform my everyday mantle into a spooky space was a quick trip to my local Jo-Ann Fabrics and Craft Store for supplies to create a simple craft and a couple additional Halloween decor items, plus a few more pieces I already had laying around the house.
The Holiday Decorations Spider Web Mantle Scarf, Martha Stewart Happy Halloween Banner, paper-mache witches hat and paper-mache tombstone were each on sale at Jo-Ann's and only ran me a total of $14.26. Not too shabby!
Tuesday, October 1, 2013
Baby on Board // How to Prepare for Baby...Or Not!
On Friday I'll be ringing in 36 weeks of pregnancy and it just dawned on me that this little baby could arrive anytime. And we are not ready!
Scratch that. We're slightly ready. In an effort to clean up the upstairs and make it usable, the hubs installed the infant car seat in the car and the baby stuff was located and haphazardly piled in a corner to get to later....hopefully before the baby actually arrives. Luckily we saved a good supply of clothes and swaddle blankets so the only necessities we're lacking is a place for the baby to sleep and some diapers. Kind of left the important stuff, huh?
The one effort we have made to get ourselves ready for baby was probably the least important of all - in terms of necessities - but it is one of the most important for this Mama.
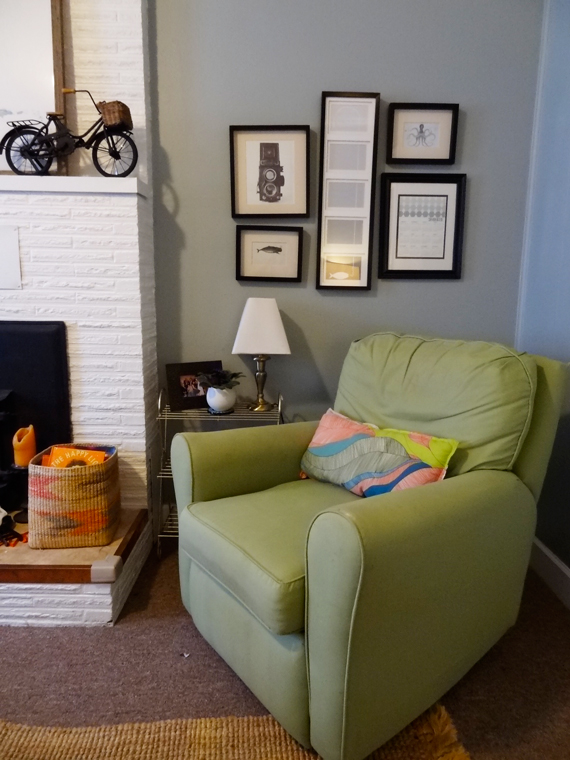
We replaced our little living room office area with "the best rocking chair in all the land" which we've been storing upstairs for the past 2 years. Seriously, this chair blows your dad-chair out of the water. It does it all - rocks, swivels and reclines. Plus, it also has a matching rocking ottoman. And my favorite of all....the head cushion is freaking comfortable. Whoever built this chair found some way to capture a cloud and stuff it into a chair. It's a miracle I don't fall asleep as soon as I plop down into it. I spent many hours in this chair when Luke was a baby and I suspect I'll be spending just as much time with our new little one. Although I guess I will have another kid that will require my attention...two kids?! Is it strange that I still haven't fully comprehended what's in store?
Scratch that. We're slightly ready. In an effort to clean up the upstairs and make it usable, the hubs installed the infant car seat in the car and the baby stuff was located and haphazardly piled in a corner to get to later....hopefully before the baby actually arrives. Luckily we saved a good supply of clothes and swaddle blankets so the only necessities we're lacking is a place for the baby to sleep and some diapers. Kind of left the important stuff, huh?
The one effort we have made to get ourselves ready for baby was probably the least important of all - in terms of necessities - but it is one of the most important for this Mama.
We replaced our little living room office area with "the best rocking chair in all the land" which we've been storing upstairs for the past 2 years. Seriously, this chair blows your dad-chair out of the water. It does it all - rocks, swivels and reclines. Plus, it also has a matching rocking ottoman. And my favorite of all....the head cushion is freaking comfortable. Whoever built this chair found some way to capture a cloud and stuff it into a chair. It's a miracle I don't fall asleep as soon as I plop down into it. I spent many hours in this chair when Luke was a baby and I suspect I'll be spending just as much time with our new little one. Although I guess I will have another kid that will require my attention...two kids?! Is it strange that I still haven't fully comprehended what's in store?
Wednesday, July 24, 2013
Flea Market Decor Magazine Feature: DIY Ottoman Revamp
There's something very fulfilling about taking a discarded piece of furniture and giving it new life. Remember that thrifted ottoman I revamped with some spray paint and new fabric? No, well grab the latest issue of Flea Market Decor for a refresher. That's right! This girl is back in the pages of a magazine!

There's also something equally fulfilling about seeing yourself in print. I guess that's why Oprah puts herself on the cover of her mag every month...good thinking Lady O.

There's also something equally fulfilling about seeing yourself in print. I guess that's why Oprah puts herself on the cover of her mag every month...good thinking Lady O.
Thursday, May 16, 2013
DIY Problems - 7 Lighting Options for Low & Shallow Ceilings
Can a DIY project ever go smoothly, asks the frustrated DIY'er. We're smack dab in the middle of renovating our mudroom/breakfast nook and things were going very smoothly until the hubs went to install the wiring and housings for our new recessed lights in the mudroom. Unfortunately for us, our dang ceilings in this room, which is a stark contrast to our 9 foot ceilings elsewhere, are low (slanted, in fact) and shallow. With their pivoting lights and extremely low-profile gimbal recessed lights solve the height and slant problems but most likely will not work for the shallow issue - there's only 3 1/2 inches from the ceiling to the roof. I'd love to share a photo with you of exactly what I'm talking about but I can't! It's a surprise...but you'll get to see the entire process soon enough. Until then, you'll just have to be content with my horrible descriptions.
Instead of installing three recessed lights - which would illuminate the corner bench area, the entry and the laundry closet - we have to figure out another plan. The corner bench area is easy - I'm going to track down some killer sconce lights like this Princeton Junior sconce or this Satellite Wall sconce, both by Schoolhouse Electric, but the two overhead lights are a whole 'nother story. Two recessed lights will now become one mounted light.

Like I mentioned before, we're leaning towards this gorgeous Eldridge Rectangular Chandelier from Ballard Designs for our nook area which will be open and visible to the mudroom. So, something that coordinates without overly competing would be ideal, plus we need something like a short pendant style so that can be mounted but will hang straight. While I'm on the hunt for our perfect light, I thought I'd share these perfect options (just not perfect for our specific space) that could pair nicely with the Eldridge light.

{1} The Franklin 2.25" Light $127 as shown from Schoolhouse Electric - it's simple, clean and has that same vintage-modern vibe that the Ballard Designs light has.
{2} Another option would be something similar to this Single-Light Sebring Outdoor Ceiling - $114. Although it's an outdoor light, I like the industrial style of it plus it's a DIY project in the making.
{3} Pottery Barn's Fisherman's Flushmount Light is very similar to the option above and is a little more expensive at $199.
{4} Another option that caught my eye at Pottery Barn is the Julian Flushmount light. It's also listed for $199 and is a more elegant twist on the boob light.
{5} A less desirable option but something that would definitely work for a low ceiling would be something like this Saturn Small flush mount light from Lithonia Lighting.
{6} Track lighting might be the way to go to avoid flush mounts altogether but once again, height may be an issue depending on the lights you choose. I love the style of the Pottery Barn lighting track.
{7} Ikea has an inexpensive track lighting option, the KRÄMARE Ceiling Track, but a little hacking would be involved, i.e. spray paint, to get a similar finish as the Eldridge. At only $24.99 including three lights, it might be a great option although not exactly the perfect pairing with the Eldridge.
The clock is ticking so I better stop because as much as I love finding lighting options - I really just need to find lighting options that will actually work for us. So.....the pendant lighting search begins! Think happy, budget-friendly thoughts.

Instead of installing three recessed lights - which would illuminate the corner bench area, the entry and the laundry closet - we have to figure out another plan. The corner bench area is easy - I'm going to track down some killer sconce lights like this Princeton Junior sconce or this Satellite Wall sconce, both by Schoolhouse Electric, but the two overhead lights are a whole 'nother story. Two recessed lights will now become one mounted light.

Like I mentioned before, we're leaning towards this gorgeous Eldridge Rectangular Chandelier from Ballard Designs for our nook area which will be open and visible to the mudroom. So, something that coordinates without overly competing would be ideal, plus we need something like a short pendant style so that can be mounted but will hang straight. While I'm on the hunt for our perfect light, I thought I'd share these perfect options (just not perfect for our specific space) that could pair nicely with the Eldridge light.
{1} The Franklin 2.25" Light $127 as shown from Schoolhouse Electric - it's simple, clean and has that same vintage-modern vibe that the Ballard Designs light has.
{2} Another option would be something similar to this Single-Light Sebring Outdoor Ceiling - $114. Although it's an outdoor light, I like the industrial style of it plus it's a DIY project in the making.
{3} Pottery Barn's Fisherman's Flushmount Light is very similar to the option above and is a little more expensive at $199.
{4} Another option that caught my eye at Pottery Barn is the Julian Flushmount light. It's also listed for $199 and is a more elegant twist on the boob light.
{5} A less desirable option but something that would definitely work for a low ceiling would be something like this Saturn Small flush mount light from Lithonia Lighting.
{6} Track lighting might be the way to go to avoid flush mounts altogether but once again, height may be an issue depending on the lights you choose. I love the style of the Pottery Barn lighting track.
{7} Ikea has an inexpensive track lighting option, the KRÄMARE Ceiling Track, but a little hacking would be involved, i.e. spray paint, to get a similar finish as the Eldridge. At only $24.99 including three lights, it might be a great option although not exactly the perfect pairing with the Eldridge.
The clock is ticking so I better stop because as much as I love finding lighting options - I really just need to find lighting options that will actually work for us. So.....the pendant lighting search begins! Think happy, budget-friendly thoughts.
Wednesday, February 27, 2013
Pinterest Challenge Winter Edition 2013: DIY Terrarium
I've been slacking on the blog this week - there's just so much going on. Track season started and we had our first day of practice on Monday and then I had a job interview on Tuesday at my husband's high school so I've been a little preoccupied, but I did manage to take part in The Pinterest Challenge Winter Edition!
Boy, did I need the motivation to get going on some projects. Currently, I've racked up nearly 2800 pins. That's a whole lot of inspiration, DIY, recipe and craft photos! Last year during the Pinterest Challenge Winter Edition I was all about the coming of spring and made a Tin Can Man that still hangs in our yard. Well, this year is no different. I'm counting down the days until the rains depart and the sun takes up a semi-permanent residence.
Rather than getting my green thumb on outdoors I decided to bring the greenery indoors with a few DIY terrariums.

I was inspired by projects like this and this and was pleasantly surprised at the ease of the project once I finally got my butt to the store to purchase the plants and glass containers. I scored three beautiful glass containers from the Goodwill in Bellevue, Wa while I was visiting my sister.
Boy, did I need the motivation to get going on some projects. Currently, I've racked up nearly 2800 pins. That's a whole lot of inspiration, DIY, recipe and craft photos! Last year during the Pinterest Challenge Winter Edition I was all about the coming of spring and made a Tin Can Man that still hangs in our yard. Well, this year is no different. I'm counting down the days until the rains depart and the sun takes up a semi-permanent residence.
Rather than getting my green thumb on outdoors I decided to bring the greenery indoors with a few DIY terrariums.
I was inspired by projects like this and this and was pleasantly surprised at the ease of the project once I finally got my butt to the store to purchase the plants and glass containers. I scored three beautiful glass containers from the Goodwill in Bellevue, Wa while I was visiting my sister.
Tuesday, February 19, 2013
DIY DECOR: Faux Bronze Hand Bookends
I love all things books. Check that. I love all things real books - not those fake e-books. I love the look, smell, feel and our house is overflowing with them. I've been on the hunt for some quirky bookends to organize and display some of our favorites and just haven't found anything that had the golden combo of being budget friendly and our style. Then, while cruising the local craft store I stumbled upon a selection of paper mache craft hands and that crafty little lightbulb of mine went off quicker than you can say The End!

I've been on a roll with the simple DIY projects lately like my ottoman redo and my pillow covers and this one is no exception. The supply list was short:
I've been on a roll with the simple DIY projects lately like my ottoman redo and my pillow covers and this one is no exception. The supply list was short:
Tuesday, February 5, 2013
DIY DECOR: A Dark & Dated Ottoman Gets a Bright Update
Just like my trash to treasure cabinet, there's nothing better than taking a "seen-better-days" piece and transforming it into something beautiful. This ottoman is no exception. Plus, this had to be the one of the easiest upholstery projects in history - right up there with my chair cushion upholstery project! If you can cut fabric and wield a staple gun then you can upholster a cushion.

I grabbed the piece from our local thrift shop for $3.99. The floral needlepoint top was a little too traditional and dated for our home, but I knew with a little cleanup and update it could be a cool addition to our living room decor.

I grabbed the piece from our local thrift shop for $3.99. The floral needlepoint top was a little too traditional and dated for our home, but I knew with a little cleanup and update it could be a cool addition to our living room decor.
Tuesday, January 29, 2013
Home Design Rules And Why You Can Break Them
A recent post on my living room update and my latest Houzz Ideabook and the uproar it caused in the design world (I wish!) over the length of my curtains got me thinking....Why do we think we HAVE to abide by someone else's rules for our home to be considered beautiful or well-designed? And, why are we bullied into doing things because someone else says it looks good or, on the flip side, that it doesn't? Don't get me wrong, this is not a rant against negative feedback but just a nudge to all of us to open up our minds just a little.


Wednesday, January 23, 2013
Houzz: Sew A Pair of Easy Sag-Top Curtains
I teased you guys earlier this week when I shared my new living room curtains with you. Well, as promised, here's the tutorial for all of you who want to make your own or are just curious how it was done. By no means am I a skilled seamstress....more of a fly by the seat of my pants and hope things work out type. Luckily I have my Nana to help me wrap my head around projects. Skills or not, these curtains are sooo easy to make. And for all of those "I like the curtains better longer" folks: Yes, I know that these are rocking the high-water style, but I'd rather have a set of curtains than a pile of threads. For some reason our cat won't mess with them at this length, but when they are to the floor they get destroyed.
For all the tips and tricks for making your own, check out the full tutorial on my latest Houzz Ideabook.
I'm still in awe how much these curtains transformed our living room. It feels like a different space altogether and all it took me was an hour's time, tops!
So what do you use to transform a space? Paint, textiles or both?
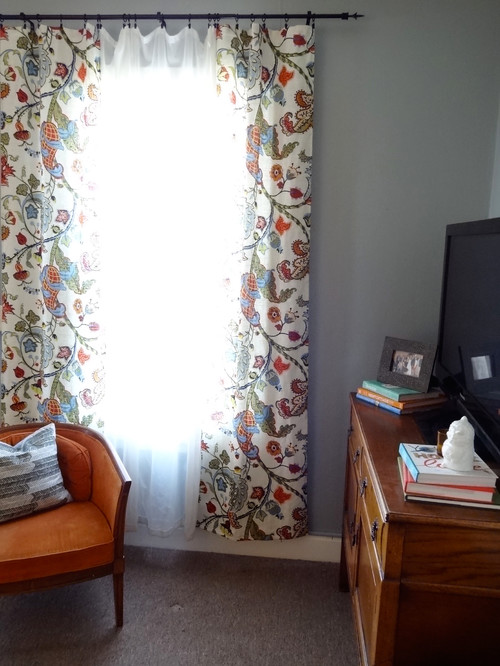


For all the tips and tricks for making your own, check out the full tutorial on my latest Houzz Ideabook.
I'm still in awe how much these curtains transformed our living room. It feels like a different space altogether and all it took me was an hour's time, tops!
So what do you use to transform a space? Paint, textiles or both?
Tuesday, January 22, 2013
Home Organization: Living Room Chapter 2
Continuing on my quest for a more organized and all-around more relaxing home, I hit the living room for the second time. With the eastern side of the room cleaned up it was time to hit the western half. Since I had already picked up the toys and books, plus cleaned up the sofa - this side of the room was pretty well organized. What it was lacking was any sense of style or personality - just like the east side of the room before the addition of the vibrant draperies which are intentionally rocking a high-water style and the throw pillows.

Since I moved the large map from the large wall to the mantle (which seems to work better) the wall is back to being a large blank wall. I didn't tackle that bare space, but I did work on the wall to the right of the fireplace.

Since I moved the large map from the large wall to the mantle (which seems to work better) the wall is back to being a large blank wall. I didn't tackle that bare space, but I did work on the wall to the right of the fireplace.
Monday, January 21, 2013
DIY: Sew Your Own Simple Pillow Cover
Creating a room that feels put together and cohesive is every
homeowner's dream. Paint, drapery and decor are each important to the
overall design and feeling in a space. Throw pillows - a great accessory
to achieving this well-rounded look - can add a burst of color, texture
and personality and are a great way to play with patterns and colors.
Beautifully covered pillows are easy on the eyes, but perhaps not so
much on your pocketbook.
Using leftover Covington Wilmington Multi fabric from my drapery panels, I made two envelope-style throw pillows. These envelope-style pillow covers are the perfect use of leftover fabric giving my simple navy sofa a boost of color and pattern. They can easily be removed for cleaning or just to change-up the decor.

Materials/Supplies:
Using leftover Covington Wilmington Multi fabric from my drapery panels, I made two envelope-style throw pillows. These envelope-style pillow covers are the perfect use of leftover fabric giving my simple navy sofa a boost of color and pattern. They can easily be removed for cleaning or just to change-up the decor.

Materials/Supplies:
Friday, January 18, 2013
Saggy Never Looked So Good
With the living room looking so lovely and organized I finally got motivated to break out the sewing machine and check off a fun project off my ever-lengthening to-do list. I've been on the hunt for some fabric to make roman shades for the kitchen and breakfast nook and have been having one hell of a time finding the perfect fabric. I thought I had found just what I was looking for - white or off-white linen fabric with a colorful floral design - and picked up the Covington Wilmington Multi fabric, which is a vibrant paisley linen blend from Online Fabric Store during their Cyber Monday sale for $13.99/yard and free shipping (it's currently selling for $17.95/yard.)
Four yards of fabric arrived at our doorstep a week or so later. I was so excited to get started on the roman shades so I ripped open the package and pulled out the fabric. In the five seconds that it took to take it in I knew that it would be perfect for the living room. Yes, that's right. The living room. So, I guess it's back to the grind on finding fabric for the kitchen, but at least I found the perfect fabric for one room in our house. The full DIY on how I made these simple sag-top drapery panels is on its way via Houzz, but I couldn't help but share a few photos with all of you....and if you're following me on Instagram, you probably already saw the sneak peek.
Here's what the room looked like after it got an organization overhaul. Pretty organized, but definitely lacking in personality.

And here's what it looks like with a pair of beautiful sag-top drapes flanking the window.
Four yards of fabric arrived at our doorstep a week or so later. I was so excited to get started on the roman shades so I ripped open the package and pulled out the fabric. In the five seconds that it took to take it in I knew that it would be perfect for the living room. Yes, that's right. The living room. So, I guess it's back to the grind on finding fabric for the kitchen, but at least I found the perfect fabric for one room in our house. The full DIY on how I made these simple sag-top drapery panels is on its way via Houzz, but I couldn't help but share a few photos with all of you....and if you're following me on Instagram, you probably already saw the sneak peek.
Here's what the room looked like after it got an organization overhaul. Pretty organized, but definitely lacking in personality.

And here's what it looks like with a pair of beautiful sag-top drapes flanking the window.
Subscribe to:
Posts (Atom)
©
Revamp Homegoods. All rights reserved.