A budget-friendly DIY & lifestyle blog

Wednesday, July 25, 2012

Houzz: Build a Modern Window Planter Box

Window planter boxes are a great way to add an architectural element and a boost of color to your home's exterior. There are a wide variety of styles out there; I chose to create a simple box style to reflect our 1900 cabin-style home and shed.

We recently built a shed to store all those items that we've been piling in our unfinished upstairs and that we're sure to need in the future — at least, that's what I tell my husband. But the shed's simple rectangular shape was needing some serious style help, especially given its visible position in our yard. We added a six-paned window, which gave it a little somethin' somethin', but it was still a blank slate. I wanted to add simple color and texture, and I thought a window planter box would be the perfect addition.


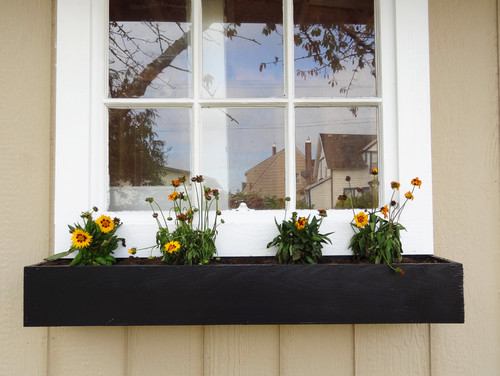
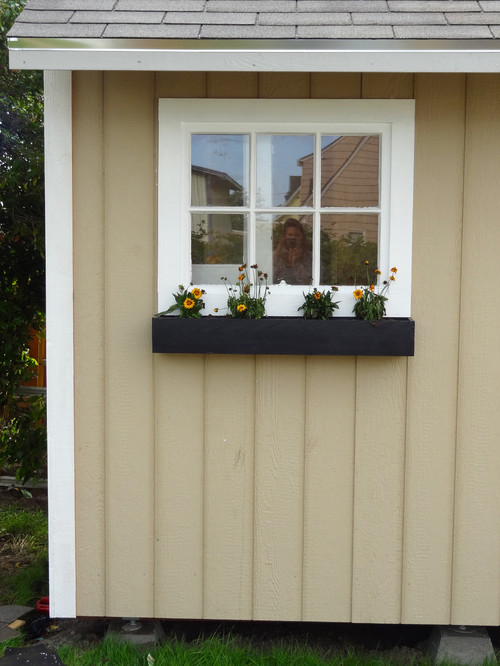
Learn how to build your own simple window planter boxes by checking out my most recent Houzz Ideabook.


Have you built any window planter boxes of your own?  I'd love to see what style you built!


Disclaimer:  As a Contributor I have been compensated for any Ideabooks featured on Houzz, although I am not compensated for sharing Houzz ideabooks on Revamp Homegoods.  All opinions expressed here or that of the writer and are in no way influenced by Houzz.


SHARE:

Monday, July 23, 2012

Before & After: Bland Nursery to Hip Big Kid Room

The old adage "time flies" is ringing true this week.  Luke transitioned from his crib to a big boy bed after he started scaling it like he was climbing over a pebble.  I figured that his room might as well get a big boy update as well so I turned to my good ol' friend - Paint.


I broke out some painters tape and two gallons of OOPS paint from Home Depot one in a semi-gloss white and the other in an eggshell gray and painted large stripes on the walls.  Once I got the gray on
SHARE:

Thursday, July 19, 2012

Houzz: Frame Your Garden With a DIY Arbor

When the sun is out and shining (even when it hasn't been) we've been busy working outdoors sprucing up our yard with some a pea gravel pathway, hanging shelves, a brand new deck and now this beautiful garden arbor.  Does your yard need a little boost like ours did?


This garden arbor is simple to build and has a beautiful end result — the best of both worlds for a do-it-yourselfer. The base of this arbor consists of a basic structure that can be as simple or as ornate as desired, and the piece can be used in many ways outdoors. Use it to showcase a walkway, create a transition from one place to another, cover a bench or gate, or frame a gorgeous view.

Check out all the details here:


Have you guys built any garden arbors of your own?  I'd love to see what you built!


Disclaimer:  As a Contributor I have been compensated for any Ideabooks featured on Houzz, although I am not compensated for sharing Houzz ideabooks on Revamp Homegoods.  All opinions expressed here or that of the writer and are in no way influenced by Houzz.
SHARE:

Thursday, July 12, 2012

DIY // Driftwood Chalkboard

Lately, I've been on a driftwood kick.  (Along with the design world.) I love how rugged and unique each piece is.  And there's just something cool about the power of water.

I always have my eye on the shore when we walk down to the port or to the local beach just hoping to spy an interesting piece that I can lug home.  I have hopes of making a couple driftwood log side tables.  And while I wasn't THAT motivated, I did manage to create an amazing driftwood framed chalkboard with some recent finds.  You might have caught a glimpse of it in my "I Told You So" Cabinet post.


If you love adding natural elements to your decor and are looking for a quick and easy DIY project this one should be it. 

Supplies:
SHARE:

Wednesday, July 11, 2012

Astoria Craft Party August 24th 4-8pm

We are well underway with plans for the first ever Astoria Craft Party on August 24th from 4-8 pm at the Fort George Lovell Building.


We have an amazing lineup of activities:
  • Blacksmith Crafts
  • "Broken Glass" frames 
  • Glass Ornament Blowing
  • License Plate Art
  • Nautical Fancy Work
  • Paper crafts made from vintage maps and charts
  • Photo Walk
  • Pinback buttons
  • Rag Dolls
  • Salvaged Door Knob Hanger
  • Scrabble tile art
  • Spindle Bird Feeder
  • Stenciled Subway Style Pallet Art
  • Stenciled Scandinavian Flag Tote Bags
  • Vintage Cabinet Door Chalkboards
  • Vintage Drawer & Window Planters
For more details, check out AstoriaCraftParty.blogspot.com.  Hope to see you all there!


SHARE:

Houzz: Build A Beautiful Platform Deck

Have you thought about building a deck but just didn't think you could manage a project of that scale?  Well, think again!


Learn how to build this amazingly beautiful platform deck in my Houzz Ideabook.


Disclaimer:  As a Contributor I have been compensated for any Ideabooks featured on Houzz, although I am not compensated for sharing Houzz ideabooks on Revamp Homegoods.  All opinions expressed here or that of the writer and are in no way influenced by Houzz.
SHARE:

Monday, July 9, 2012

Pinterest Challenge Summer Edition: Good (re)vs. Evil Kid's Cape

Guess what time it is????  YEP!  It's...


Jumping up and down?  Me too!


The lovely ladies, Katie from Bower Power and Sherry from YoungHouseLove along with the equally lovely Kate - better known as Centsational Girl and Michelle from the blog Ten June are the hosts for this summer edition.
SHARE:

DIY // A Trash to Treasure "I Told You So" Cabinet

If ever a moment deserved an "I told you so" this would be it.


I packed this sad looking oak cabinet home from my friend's mom's house and was welcomed with laughter and exclamations of doubt.  I don't know how many times I've heard it referred to as firewood from my husband, brother and dad.  Oh ye of little faith.  It's honestly hard to blame them for their lack of vision.  This cabinet was in ROUGH shape.
SHARE:

Wednesday, July 4, 2012

Houzz: DIY: Easy Outdoor Cushions

Happy Independence Day!  Hope you're enjoying the holiday and celebrating comfortably outdoors!

Speaking of comfort...

Style and comfort go hand in hand when I'm designing a space. Whether it's a bedroom or the outdoors, a bit of texture can transform an austere space into an inviting retreat. Pillows in bright colors and beautiful patterns are one of the easiest ways to do this.


But there's no need to spend a lot on them at your local home decor store — instead, save some pennies and make these versatile cushions yourself. Does the thought of sewing give you an anxiety attack? Don't worry, even a beginner like me had it easy with this project.

Check out my Houzz Ideabook to see how I did it.


SHARE:

Tuesday, July 3, 2012

July Sponsor Love

Happy July!  I have a great list of sponsors for you this month.

First up is Linda at burlap+blue.  Linda is a fellow DIY-er and all around talented lady with her own etsy shop. Linda was featured in the July Featured Sponsor post.  Be sure to check it out to learn all about Linda & burlap+blue and enter the giveaway to win a $25 credit to Linda's online shop!


Next up is HomeZada, a killer online and mobile software program to help organize and manage your home.  This software program is amazing!  I recently signed up for the free membership and can't wait to use it to organize our home remodeling projects and catalog my home inventory to be one step closer to being prepared for any emergencies.  Also their multi-home management tool is sure to keep us on top of any maintenance and care for both our condo and current home.   Stay tuned for an in-depth feature and giveaway in August!

SHARE:

DIY // A Home for It All Kitchen Organization

Clutter!  Do you suffer from it? We sure do.  I like to have everything put away in its place, but for some reason everything always finds its way onto our kitchen counters.

Before the little kitchen remodel, we stored our dishes and food in the cabinets (like most sane folks), but we also had to add a buffet to store all of our little appliances, such as the crockpot, rice cooker and blender.  And then the food also found its way into the hallway closet.  There's just never enough space for it all. So we copied the cool kids and installed some open shelving to showcase our white dishes and maximize our cabinet space. Check out the open-shelving tutorial I created for Houzz.

We also added a few other key wall storage items to help us say adios to the countertop clutter.  Ikea hit the mark again with their wall storage options.  We implemented their Grundtal magnetic knife rack {$8.99} and their Inreda glass rack {$10 for 5-pack}, which we still have yet to put up.  We also used Ikea's Bygel rail with a couple old refrigerator baskets for some additional wall storage.


SHARE:

Sunday, July 1, 2012

July Featured Sponsor & Giveaway: Linda at burlap+blue

Hey there!

We've got a great lineup of sponsors for the month of July and I'm so excited to share our first featured sponsor, the super creative Linda from burlap+blue.  At burlap+blue you'll discover etsy finds, DIY projects, tutorials and other home inspiration.

Does this blog sound familiar?  You might have seen her in...BRIDES magazine-April 2011, Eco-Beautiful Weddings Magazine-Summer 2011, Richmond Magazine’s R-Home-Nov/Dec 2011,  Apartment Therapy, Handmade Spark, Mammamoiselle, & The Plunge Project.  Yeah, she's big-time, folks!


Linda is a woman after my own heart.  Along with decorating her home, she also shares a fondness for spray paint and thrift stores.  Plus, she's a big fan of DIY.  And anyone that argues that you don’t have to spend a lot of money to get a lot of style is sure to be among my besties.  It's  just too bad we live on opposite sides of the country!  In addition to Linda's blog, you can also catch up with her at twitter, facebook, and pinterest.
SHARE:
© Revamp Homegoods. All rights reserved.
Blogger templates by pipdig
09 10 Code line 7 9 is for loading jQuery library. Remove this line if you’ve already loaded it somewhere else in your blog. Hint: If your blog has an image slider, carousel or something with fading effect running, chances are it is powered by jQuery. If this widget doesn’t work, the first thing you want to do is comment out or remove this line. To use your own button, replace the URL in line 3 with the direct link URL to the image. Make sure to keep the quotes. To reposition the button, replace