A budget-friendly DIY & lifestyle blog

Wednesday, August 29, 2012

Houzz: Quick Fix How to Patch A Drywall Hole

Homes, even beautifully designed ones, receive their fair share of abuse over the years. Unsightly holes from repair projects gone wrong, rough and tumble children or those pesky doorknobs can detract from the lovely home you've created. While seemingly daunting, most small- to medium-size holes take little time to repair, and the fix can be done by the most novice handyman (or woman) — getting your home back to being the envy of the block.

BEFORE: This 2-inch divot from a wayward hammer stroke was in a visible location just beneath the mounting hardware of ourMoen Glenshire Pivoting Mirrorand in desperate need of being patched. To learn how you can repair holes in your drywall, just like we did, jump on over to my latest Houzz Ideabook.


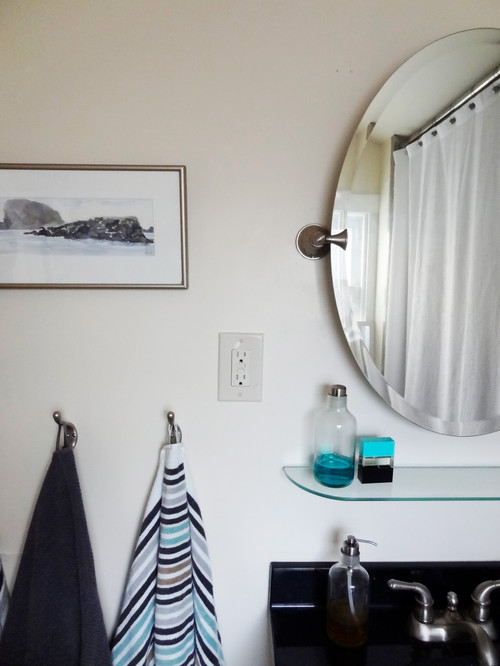
Hopefully, I can show a little more control with the hammer.  If not at least I know how to fix my mistakes.


Disclaimer:  As a Contributor I have been compensated for any Ideabooks featured on Houzz, although I am not compensated for sharing Houzz ideabooks on Revamp Homegoods.  All opinions expressed here or that of the writer and are in no way influenced by Houzz.


SHARE:

Friday, August 24, 2012

DIY // A Colorful Bedroom Makeover for Cheap

Phew!  It sure does feel good to be back.  While I've been incommunicado I've had plenty of time to get my home cleaned and organized. But it wasn't being unplugged or the impending return of my lovely fisherman, it was these orange bedside lamps that got my organization engine roaring.


I know I've mentioned this before but clutter is our number one foe at Casa de Padgett.  I've gotten the kitchen pretty much clutter free - aside from one section of counter that always seems to collect junk - by implementing some much needed wall storage and Luke's room is freshly painted and organized.  The living room is usually not too bad, but our bedroom...our bedroom usually looks like a tornado made its way through.


SHARE:

Thursday, August 23, 2012

Houzz: Quick Fix Reupholster A Chair Seat

This bedroom got an entire overhaul.  Along with the lamps, the vintage reproduction art and the painted rug I also updated a midcentury modern chair.  It, along with three of its friends, was a recent thrift shop score; I purchased four chairs for $20. Yes, $20 total.  Their clean lines and sleek frame plus their solid wood construction made them a perfect addition to our home. One special chair, originally intended for our breakfast nook, is now, happily, stationed in our bedroom.

 
I love the interest the bold fabric creates.  This before photo certainly shows the amazing transformation.
SHARE:

Wednesday, August 22, 2012

DIY // How-To Paint a Rug

Hey there!

If you're a frequenter of Pinterest or any other site that touts billions of home DIY projects, I'm sure you've seen the "painted rug" project everywhere.  Bottom line:  rugs are expensive.  They're also incredibly eye catching and can turn a blah room into something spectacular.  So it's really no surprise why making a less expensive version is so popular.


I used a simple flatwoven white IKEA Erslev rug for $39.99 and created a bold white and black striped beauty.
SHARE:

Monday, August 20, 2012

DIY // Vintage Reproduction Postcard Wall Art

I've always been a fan of postcards.  With their beautiful landscape photography or the photo and hilarious quip combination plus a short and sweet message from the sender - nothing beats getting these in the mail.  Josh and I still write each other and I'm sure to send a postcard or two during our summer absences.  This year I picked up a pack of the WPA National Park Service vintage reproduction postcards from REI to send to the hubs.


We're a camping family and these are perfect little reminders of where we've been or want to go.  These prints are gorgeous.  I knew that I didn't just want to send them and shove them in a box to be forgotten.  So I took the postcards and four IKEA Ribba frames at $1.99 a pop and created some amazing graphic wall art for just around $10 total.
SHARE:

Thursday, August 16, 2012

DIY // How-To Transform Thrift Store Lamps in Minutes

Well, I bet ya'll pretty much gave up hope thinking you'd ever see the lamp reveal I promised.  I'm sure you've been tossing and turning the past 6 days racking your brain - "Did she paint them blue?  It must be blue - No, it has to be green.  Or is it orange?  I HAVE TO KNOW!"


These two Lights of America Sun Light Lamps are energy efficient full spectrum lamps and were thrift store purchases for $4.99 each.  Like the style and the full spectrum benefits like increased serotonin levels and vitamin D production?  Get yours here although these lamps new are around $99.
SHARE:

Houzz: Make Your Own Chalkboard Paint

I'm back!  From forgetting my adapter cord for my camera at my parent's house to my computer's ac charger ripping into two, it's been impossible to post anything.  I have quite a few projects waiting in the wing, but I thought I'd first share my most recent Houzz project - making my own chalkboard paint.


Chalkboard paint is popular thanks to its blend of sentiment, whimsy and practicality. Whether it's painted on walls, furniture or appliances, chalkboard paint has certainly come a long way from the basic green or slate gray boards used in schools.
SHARE:

Wednesday, August 8, 2012

Houzz: How to Paint Perfect Wall Stripes

Whether they're horizontal or vertical, stripes are one trend I hope won't go out of style any time soon. This versatile motif adds visual interest and can help showcase a room's fine points and de-emphasize flaws.

Use vertical stripes in a room with low ceilings to create the illusion of height, or use wide horizontal stripes in a room with high ceilings to ground the space. Play with the size and color to create a unique look — subtle tone-on-tone stripes of equal size create a subdued and relaxed environment, while bright, contrasting stripes varying in size create a more modern and graphic impact.


Now that I have you ready to bust out your painting supplies, here's a helpful how-to that will help you achieve perfect stripes every time. Check out my latest Houzz Ideabook for all the tips and tricks.


So what about you guys?  Are you fans of using stripes on your walls?  Or do you prefer to use them on decor throughout your home?


Disclaimer:  As a Contributor I have been compensated for any Ideabooks featured on Houzz, although I am not compensated for sharing Houzz ideabooks on Revamp Homegoods.  All opinions expressed here or that of the writer and are in no way influenced by Houzz.


SHARE:

Monday, August 6, 2012

August Sponsor Love

Another great summer month with another great list of sponsors!

First up is HomeZada, a killer online and mobile software program to help organize and manage your home.  This software program is amazing!  I recently signed up for the free membership and can't wait to use it to organize our home remodeling projects and catalog my home inventory to be one step closer to being prepared for any emergencies.  Also their multi-home management tool is sure to keep us on top of any maintenance and care for both our condo and current home.   Check out the in-depth feature and giveaway in this post!


SHARE:

Wednesday, August 1, 2012

Houzz: How to Replace Window Trim

Whether I'm flipping through a magazine or watching the latest home show on TV, I'm always drawn to a house's trim. I love how the use of different architectural trim elements can completely change the feel of the entire house. Sometimes that can be good, and sometimes it can be utterly awful.

When we replaced our outdated and wallet-busting single-pane aluminum windows with energy-efficient double-pane vinyl windows in our kitchen nook, I began dreaming of adorning the windows with beautiful trim. I was excited for the end result, but since I'm always so focused on trim in other people's homes, I was completely terrified about actually choosing the trim and putting it in place in my own home. 


The possibilites for trim are positively endless. I wanted to keep things pretty simple for our 1900 cabin-style home, but I also wanted to let the trim draw the eye and showcase our view to the backyard. I got lost in all of the choices online. So I pulled back, checked out our local home store and went with my gut. Luckily, I found installing the trim to be a much easier process than picking it.


Visit the Houzz Ideabook to learn the how-tos of replacing window trim.


Disclaimer:  As a Contributor I have been compensated for any Ideabooks featured on Houzz, although I am not compensated for sharing Houzz ideabooks on Revamp Homegoods.  All opinions expressed here or that of the writer and are in no way influenced by Houzz.
SHARE:

August Featured Sponsor & Giveaway: HomeZada

I am super excited to share my August Featured Sponsor, HomeZada with you all. HomeZada is an online and mobile software program that helps you organize and manage your home.


What can you do with HomeZada?  Use the Home Inventory section to prepare yourself for any emergency and have important information available at your fingertips for your insurance company or use the Home Maintenance section to personalize a property calendar with key maintenance tasks & reminders so you're one step ahead of the game.  And for all of you fellow do-it-yourselfers, use the Home Improvement section to plan, budget and manage your remodel and landscape projects.  Have more than one home and having a hard time keeping track of both?  Use their Multi-Home tool to manage both.  HomeZada is literally a one stop shop for getting your home organized.
SHARE:
© Revamp Homegoods. All rights reserved.
Blogger templates by pipdig
09 10 Code line 7 9 is for loading jQuery library. Remove this line if you’ve already loaded it somewhere else in your blog. Hint: If your blog has an image slider, carousel or something with fading effect running, chances are it is powered by jQuery. If this widget doesn’t work, the first thing you want to do is comment out or remove this line. To use your own button, replace the URL in line 3 with the direct link URL to the image. Make sure to keep the quotes. To reposition the button, replace