A budget-friendly DIY & lifestyle blog

Friday, March 14, 2014

DIY // The Kitchen/Mudroom Renovation - What We Love & What We Don't

It's been a good 6 months since we finished our Kitchen/Mudroom renovation, so I thought I'd share a breakdown of what we have loved and what we kind of don't.


Let's start with the positives and a good ol' before and after as a refresher of how much this space has changed since we first moved in back in December 2011.


SHARE:

Tuesday, October 8, 2013

DIY: Replace Your Kitchen Faucet // Houzz

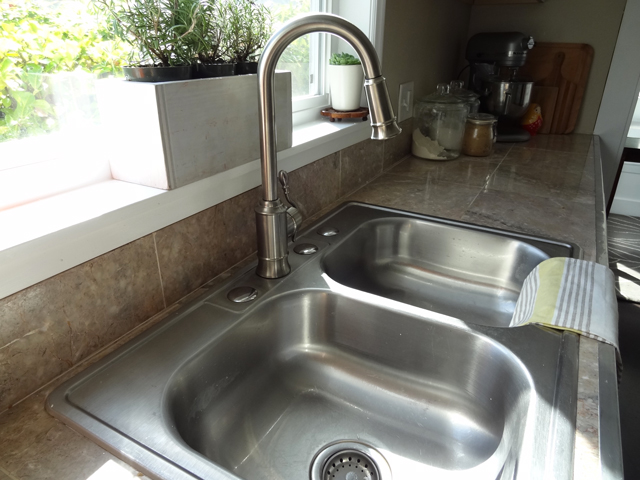
Can you say icing on the cake? (Mmm...cake.) Our basic kitchen faucet got the job done, but it wasn't grabbing anyone's attention, that's for sure!  With all the amazing changes we made to the kitchen and adjoining rooms it was leaving much to be desired.  So, when the amazing folks over at Moen contacted me about installing a new bathroom faucet from the 90 Degree line, which is gorgeous but a bit too modern for our traditional style bathroom, I shared our kitchen remodel and our need for an updated faucet and they were totally on board.  Little did I know I'd be getting the faucets of all faucets.

kitchenafter_16

Our new Moen Woodmere faucet is in a classic stainless finish and includes a pull-down spray nozzle which eliminated our need for our old spray nozzle.  It also is a single hole installation model so we were left with three additional holes after we removed our old faucet.  We'd love to add a soap dispenser and a water filter at some point but for now three stainless hole covers from Home Depot will do.

SHARE:

Wednesday, September 25, 2013

Apartment Therapy's Renovation Diary // Inspiration for Our Mudroom & Kitchen Nook

Last week Apartment Therapy shared our DIY renovation plan for our mudroom and kitchen nook.  If you missed it, we're opening up a couple walls and building a few built-ins.  It's going to be amazing.  Well, this week we're dropping some eye candy on you.


Check out our latest feature to see our inspiration for the space - but just try not to drool.  Our inspirations are full of pretty built-ins, lots of natural lighting and an overabundance of pillows!

Be sure to check out our post next week where we talk all things budget!


SHARE:

Friday, September 20, 2013

Apartment Therapy's Renovation Diary // Mudroom & Kitchen Nook Renovation

It's been a few months since I gushed on social media about an exciting new opportunity and then all was silent....I am so excited to FINALLY be able to share the news.  We're working with Apartment Therapy and contributing to their Renovation Diary feature - we'll be chronicling our DIY renovation from start to finish...all the good and the bad!

Check out our very first feature here and stay tuned for weekly updates!


So, think we'll come in on budget and on time?


SHARE:

Tuesday, December 4, 2012

Maximizing Storage By Utilizing The Space Above The Fridge

Our love for open shelving is overflowing.  In addition to the two shelves in our kitchen, which hold our white dinnerware and glass storage jars, we've added two more above the fridge.  Every extra bit of storage is needed with a couple of clutter-hounds like us and utilizing the space above the fridge was a no-brainer.


The top of the fridge typically looks like this - an eyesore if ever there was.  I removed everything and gave it a good cleaning which is something that tends to get overlooked.  Do you guys regularly wipe down the top of your fridge?


SHARE:

Monday, December 3, 2012

Kitchen Door Trim...Finally!

Back a few weeks ago, when we were replacing windows in the bathroom and mudroom, I finally tackled a project that we've been needing to finish.  While the boys were framing the new window openings, I stole the nail gun for a couple projects - putting trim on the open shelving and putting the trim back up in our doorways.


The trim has been off since we started our kitchen remodel.  I can't really say why it's taken us so long to put it back up, probably just laziness.  I mean swinging a hammer is really hard work.  With access to a nail gun I finally had the motivation to get 'er done.  Unfortunately I have few photos of the process, but it went a little something like this...
SHARE:

Tuesday, November 13, 2012

Open Shelving Gets A Trim

Remember that open shelving we installed awhile back?  We made the 4-foot long shelves from the Ikea Valter brackets and simple 1x12 white wood boards.  I love our open shelving.  It's freed up cabinet space where we used to house our plates and bowls and cleared up counter space where our glass jarred food staples used to hang out.  But what I'm not too fond of are the thin boards and the unfinished edges of each shelf.


While the boys (the hubs, my dad and my brother) were hard at work on the mudroom and while we had all the tools out, I garnered some motivation (and possibly guilt over being the only one not doing anything) and decided to finally get these shelves up to par with a quick little fix.  I pulled out a couple 1x2s from our stash to update each shelf with mitered trim.  The 45 degree miter cuts were incredibly simple thanks to the use of a chop saw, but they could also be cut using a miter box and hand saw.  I cut three trim pieces for each shelf and left the back of each trim-free since they wouldn't be seen.
SHARE:

Tuesday, July 3, 2012

DIY // A Home for It All Kitchen Organization

Clutter!  Do you suffer from it? We sure do.  I like to have everything put away in its place, but for some reason everything always finds its way onto our kitchen counters.

Before the little kitchen remodel, we stored our dishes and food in the cabinets (like most sane folks), but we also had to add a buffet to store all of our little appliances, such as the crockpot, rice cooker and blender.  And then the food also found its way into the hallway closet.  There's just never enough space for it all. So we copied the cool kids and installed some open shelving to showcase our white dishes and maximize our cabinet space. Check out the open-shelving tutorial I created for Houzz.

We also added a few other key wall storage items to help us say adios to the countertop clutter.  Ikea hit the mark again with their wall storage options.  We implemented their Grundtal magnetic knife rack {$8.99} and their Inreda glass rack {$10 for 5-pack}, which we still have yet to put up.  We also used Ikea's Bygel rail with a couple old refrigerator baskets for some additional wall storage.


SHARE:

Thursday, May 3, 2012

DIY // Perfect Painted Wallpaper

With the cabinets shining bright from their fresh coats of paint, the bare wall opposite our sink was needing a whole lotta love.  We have plans to put up some open shelving on the largest section, but that's about it.  Frankly, it's a little too blah for me so I set out to find a way to liven it up a bit.  With four layers of wallpaper underneath the new drywall I couldn't fathom putting another layer on these walls even with the awesome selection out there right now.  So I enlisted my trusty paint brush to save the day again via painted wallpaper!


 Here's a glimpse of what that wall looked like amidst the remodeling mess...


Of course chevron print crossed my mind, but I'm a little over the zig-zag craze at the moment.  Are you guys with me?  {Although I will confess that I do love this nursery by House 36 and am leaning towards this print for the seat cushion on the bench in the nook.}  So I scoured the internet looking for the perfect pattern and came upon the quatrefoil trellis.  I love this pattern and I'm not the only one.  Ballard Designs had a trellis wallpaper that they were selling for $119 for a double roll and Emily at Jones Design Company transformed the walls in her office with a stencil.  Jackpot!


I used the stencil provided by Emily and used the same double outline method.  Man, she's not kidding when she says it's tedious.  You trace the same stencil about a thousand times and go back over that with paint and then over again with a second coat in my case.  It's tiring, but the outcome is totally worth it.  All in all it taken me roughly 8 hours (obviously not in one sitting) and I expect another hour or two to get the 2nd coat on.  Now, if you're interested in this pattern but want to skip all the tedious work check out the all-over stencil at Cutting Edge Stencils.  It's sure to save you time.


So, back to that wall....After what seemed like weeks (probably because it was!) I finally finished tracing and painting the first coat and not without some crazy acrobatic tricks to get that hard to reach bottom area and corner.  Thank god for yoga and a husband who is very unselfish with doling out the back rubs (unlike his very selfish wife!)


And by golly, it's looking pretty damn good.  It's not perfect by any means, but if you don't sit there and stare at it all day long (hard, I know.) then you'll never really notice.  Hopefully.

I still have to paint another coat and we really need to get that trim back up, but I'm calling this one a victory and sharing "After" photos before it's technically finished but you can't blame me, right?


So what do you think?  Doesn't it just change the whole tone of the room?  It's true what the say...a little paint can work wonders.


SHARE:

Monday, April 16, 2012

DIY // How To Paint Kitchen Cabinets White Update

With the cabinets in place we were on to the next step..."Painting the cabinets white, we're painting the cabinets white..." The Queen of Hearts would not be pleased with our cabinet transformation, but we sure are!  Simply changing the color and height of the cabinets (in addition to our changes with our windows & walls) has transformed our kitchen from a heavy and dark place we didn't want to spend much time in, to my favorite room in the house.  I love its bright and airy feel.  I can only imagine how amazing and open it will be when we finally have the walls taken down between the nook/mudroom/kitchen.  I'm never going to want to leave.


Now let's take a look at our Before photo with the addition of the stainless appliances.
SHARE:

Saturday, March 31, 2012

DIY // Kitchen Update: Reinstalling the Kitchen Cabinets

Where were we?  Oh yes...waiting for the paint to dry.  For a look back check out Go-Go Gadget Kitchen Update, A Muddy, Dusty Kitchen Update and Rock n' Roll Kitchen Update.


With the paint finally dry and cured, we got busy putting the kitchen back together and mounting the cabinets.  We used the existing builder's grade cabinets and the same layout, so putting them back up was a breeze.  I sanded them down and gave them a coat of Zinsser Bullseye 1-2-3 Primer.  Then we mounted a ledger (1x2) to the studs to make the mounting process even easier.
SHARE:

Thursday, March 29, 2012

DIY // Kitchen Remodel Update: Go Go Gadget

Hey there!

(or is it HIGH there?  these paint fumes must be getting to me.)

Here's where we left off last...the walls were primed and ready for paint.  For a look back check out A Muddy, Dusty Kitchen Update and Rock n' Roll Kitchen Update.

Primed and Ready for Paint

Have you ever wished that you had some super-human power?  Me too!  It's usually something standard like flying, but today I wanted two bionic paint roller hands that could bust out the paint in no time and maybe some Go-Go Gadget stretchy arms so that I could do it from the comfort of the couch.  Say what?  Yes, I just dropped a righteous Inspector Gadget reference.  A-thank-you.

Anyways, back to the task at hand (or hands, heh.)  The Zinsser Bullseye 1-2-3 Primer coat had dried and the walls were finally ready for their color.  I'd love to tell you the color we chose, but I can't.  We scored a great deal on paint a few months back.  A hardware store was selling 5 gallon interior eggshell paint for $35 and they'd tint it, too.  You heard me right, 35 dollars!!  We bought two 5-gallon buckets and had one tinted to a light gray and the other to a taupe.  And you know what I did?  I had color-remorse and took them in to a local hardware store and had the color darkened up.  Well, it didn't quite come out as planned and now I'm stuck with a taupe which was created from the gray (and really is not bad at all), a strange terra-cotta color and the feeling of regret.  5 gallons of terra-cotta....not sure what I'm going to do with that!  At least the taupe works (or greige if you're hip), which is what we went with.  I think it will look nice and warm against the cool white cabinets and trim and the stainless steel appliances.

Two coats of paint went on, and quite easily, I might add.  I'm sure all the credit should go to the primer...but I think I'll take it. We're getting there people.  We might have a late night ahead of us but it'll be worth it!

Two coats of paint dried and ready for the window trim!

So, what's left?
  • Finish hanging drywall in kitchen
  • Mud/sand
  • Drywall texture
  • Prime walls
  • Paint
  • Hang cabinets
  • Install window trim & crown molding
  • Paint cabinets
  • Fun stuff (open shelving, nook benches & bookcase)
Ah, the end is in sight!

Until next time,


SHARE:

DIY // Kitchen Remodel Update: A Muddy, Dusty Kitchen

Here's where we left off in the last update...A nook with new drywall & a coat of mud and a few panels left to put up in the kitchen.  For a look back, check out the Rock n' Roll Kitchen Update.


And where are we now?
SHARE:

Monday, March 26, 2012

DIY // Kitchen Remodel Update: Rock N' Roll

Rock n' Roll kitchen indeed...Sheetrock, that is!  There's absolutely nothing more satisfying than completing a large project, especially one that was fighting you every step of the way.  Well, we're not finished quite yet, but we are well on our way.

The kitchen was pretty good to start with.  The cabinets were relatively new and the flooring was okay.  Aside from the FOUR layers of wallpaper, we were pretty much content with it staying how it was after we upgraded the appliances to stainless steel, until we realized that the cabinet was too low above the stove for the over-the-range microwave to fit.  So, the cabinets (or cabinet) would have to be raised and that meant the header-thing (or soffit, if you're technical) would have to be removed.  And then the list of things we wanted to change snowballed from there.


The breakfast nook, on the other hand, needed much more work.  And on top of the stuff we had to do, there was a lot that we wanted to do, like build a bench & bookshelf in the nook.
SHARE:

Thursday, January 19, 2012

Open Shelving: Perfect Timing, Apartment Therapy.

Have you guys been considering folowing the "open-shelving" trend?  Well, we sure are.  We're not taking any cabinets out, by any means, just building our own shelves (thanks to YoungHouseLove & Ana-White.com) and installing them on a blank wall above our buffet (similar to the photo below.) And it's like someone over at Apartment Therapy had been mind-reading me with their helpful post, "How to Know if You're Ready for Open Shelving."


I passed the quiz, although the question about clutter has me doing some thinking...but you never know until you try, so we're pushing ahead full steam.  As for the rest of you joining the craze, I suggest you read this and decide if it's really something you can do especially if your plan involves removing existing cabinetry!


SHARE:
© Revamp Homegoods. All rights reserved.
Blogger templates by pipdig
09 10 Code line 7 9 is for loading jQuery library. Remove this line if you’ve already loaded it somewhere else in your blog. Hint: If your blog has an image slider, carousel or something with fading effect running, chances are it is powered by jQuery. If this widget doesn’t work, the first thing you want to do is comment out or remove this line. To use your own button, replace the URL in line 3 with the direct link URL to the image. Make sure to keep the quotes. To reposition the button, replace