
This update was budget-friendly and simple to build, plus it totally transformed our living room. I picked up the supplies from Home Depot for less than $130 and broke out my trusty 3MDIY supplies to get started.

DIY Industrial Wall Shelving Unit Materials/Tools:
- 1x10 Whitewood boards
- (6) Single Track Utility Shelving System Upright
- (22) Single Track Utility Shelving System Brackets 10 in.
- 1 1/2" wood screws
- ScotchBlue™ Painter’s Tape with Edge-Lock
- ScotchBlue™ Drop
- Holmes Workwear™ Premium Safety Eyewear
- Digital WorkTunes™ Hearing Protector
- Rustoleum Oil Rubbed Bronze Spray Paint
- Wood stain/Brush
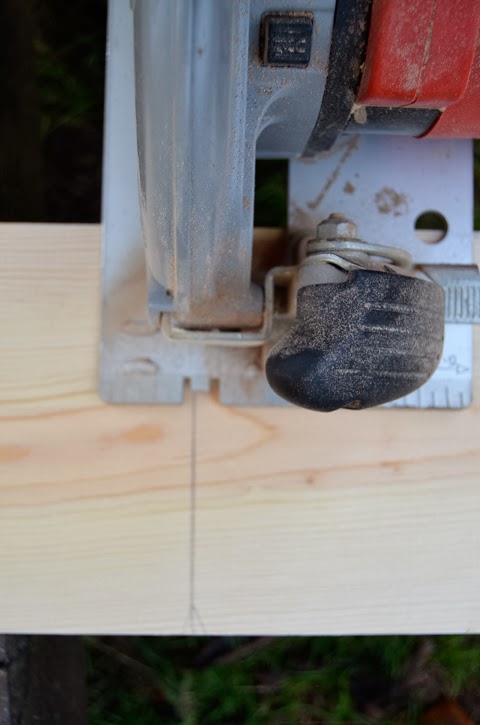
- Circular saw (or hand saw)
To get the look of the industrial shelving without shelling out hundreds of dollars for galvanized pipe and fittings I went a less expensive but still as dramatic route. The Single Track Utility Shelving System is super inexpensive and is available at Home Depot. It was only offered in metallic silver so I picked up a can of Rustoleum's Oil Rubbed Bronze Spray Paint and laid out our well-used ScotchBlue™ Drop and gave both the brackets and the uprights two coats of paint - after I scrubbed off all the labels of course. If you're a little wary of the single track's sturdiness, the dual track system might be more up your alley plus it's already offered in black. I probably would have gone with the dual track if they would have had all the brackets in stock or if I was patient...something I definitely am not when I have a project in mind. I just want to get 'er done.

While the uprights and brackets were drying between coats I broke out the circular saw and cut all the boards to the desired length (4 ft and 2 ft.) I'm always safety conscious and even more so when I'm using any power tools so I made sure I had my Holmes Workwear™ Premium Safety Eyewear and Digital WorkTunes™ Hearing Protector on.
With a new baby and an old baby in the house, plus some really wet weather the past couple of weeks, staining the boards with an oil based stain just wasn't in the cards - even with a protective mask. I still wanted to warm up the tone of the wood and didn't want to just throw the bare whitewood up on the shelves as-is so I layed out on the boards in the kitchen and stained them with a cocoa+coffee mixture. I'll be sure to share a detailed DIY post on that later.


Installation was simple. I measured the space, marked the top of the uprights and then held them in place with ScotchBlue™ Painter’s Tape with Edge-Lock while I secured them to the wall. Before securing the uprights I made sure each was level and plumb. Our walls are not framed but were built out of solid lumber back in 1900 so I wasn't too concerned about locating a stud. For those that have framed walls, locating and securing each upright to a stud is important. After each were in place, I attached the brackets to the uprights and placed each shelf on top.

TIP #1 // The brackets can seem a little wobbly - pulling each shelf out to the end of the bracket rather than against the wall helps to stabilize them.

TIP #2 // Camouflage the screw heads by coloring them with a black sharpie.

Styling the shelves is always my favorite part. Luckily I have a thrifting and book addiction so finding items to fill the shelves was no problem. The shelves replaced the vintage brass table lamp that was in the corner as did a new industrial lamp from target (also a thrifting score). For those of you interested in mid-century brass table lamps, this one is currently on the market.


A few more DIY projects made their appearance onto the shelves - the faux bronze hand bookends, the anthropologie inspired zinc letter, the glass bottle lamp and the Only Fish In The Sea art.


This room is inching closer and closer to something much more our style rather than the bland room we started with. Now I just need to get my lazy butt motivated to paint the crown, baseboards, window trim and ceilings...and takedown the Christmas decorations. Ugh.
How are you guys ringing in the New Year? Any new projects or just spending time with family and friends?


Hi! I am Celena Danielle from LifeandSnapshots.com — found you through the Thrifty Decor Chick link party and am really glad I did! Excellent project here! I'm hoping to do something similar in the coming months! Wish me luck because I don't feel confident about my measuring skills at. all. Haha! We will see. Thanks for sharing!
ReplyDeleteNo luck needed! This project is soo simple. I'd love to see the results. Come back and share your before & after.
ReplyDeleteWow!! This is amazing! I wish I had the proper tools to do something like this at home.
ReplyDeleteThanks! Really the only big tool you need is a drill since they can cut the boards for you at places like Home Depot.
ReplyDelete