With the cabinets shining bright from their fresh coats of paint, the
bare wall opposite our sink was needing a whole lotta love. We have
plans to put up some open shelving on the largest section, but that's about it. Frankly, it's a little too blah for me so I set out to find a way
to liven it up a bit. With four layers of wallpaper underneath the new
drywall I couldn't fathom putting another layer on these walls even
with the awesome selection out there right now. So I enlisted my trusty
paint brush to save the day again via painted wallpaper!
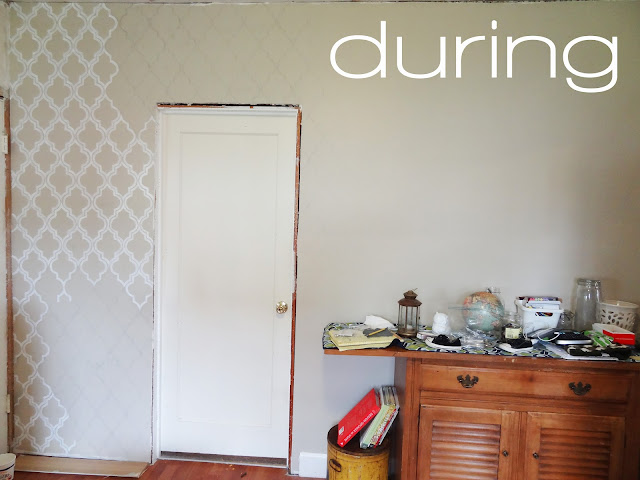
Here's a glimpse of what that wall looked like amidst the remodeling mess...
Of course chevron print crossed my mind, but I'm a little over the zig-zag craze at the moment. Are you guys with me? {Although I will confess that I do love
this nursery by House 36 and am leaning towards
this print for the seat cushion on the bench in the nook.} So I scoured the internet looking for the perfect pattern and came upon the quatrefoil trellis. I love this pattern and I'm not the only one.
Ballard Designs had a trellis wallpaper that they were selling for $119 for a double roll and
Emily at Jones Design Company transformed the walls in her office with a stencil. Jackpot!
I used the stencil provided by Emily and used the same double outline method. Man, she's not kidding when she says it's tedious. You trace the same stencil about a thousand times and go back over that with paint and then over again with a second coat in my case. It's tiring, but the outcome is totally worth it. All in all it taken me roughly 8 hours (obviously not in one sitting) and I expect another hour or two to get the 2nd coat on. Now, if you're interested in this pattern but want to skip all the tedious work check out the all-over stencil at
Cutting Edge Stencils. It's sure to save you time.
So, back to that wall....After what seemed like weeks (probably because it was!) I finally finished tracing and painting the first coat and not without some crazy acrobatic tricks to get that hard to reach bottom area and corner. Thank god for yoga and a husband who is very unselfish with doling out the back rubs (unlike his very selfish wife!)
And by golly, it's looking pretty damn good. It's not perfect by any means, but if you don't sit there and stare at it all day long (hard, I know.) then you'll never really notice. Hopefully.
I still have to paint another
coat and we really need to get that trim back up, but I'm calling this one a victory and sharing "After" photos
before it's technically finished but you can't blame me, right?
So what do you think? Doesn't it just change the whole tone of the room? It's true what the say...a little paint can work wonders.


I love the look of the quatrefoil trellis wallpaper stencil. I was just looking for one and I found some nice ones on etsy. I'm a little obsessed with DIY's also and this looks exhausting but totally doable! Good Luck!
ReplyDeleteDiscoAirglow.blogspot.com
Oh, it's so totally doable! I can definitely see the benefit in an all over stencil (less room for error), but I love how this cost me zip! Thanks for stopping by!
DeleteWow! Meg! That looks fantastic! And to think, you got your talent from me. ;)
ReplyDeleteHoly cow.... that must have taken FOREVER!! But it looks Fabulous!! Awesome job!
ReplyDeleteThanks, Allison! Glad you stopped by to check it out. Are you all ready for Baby M arrive? BTW, I've loved your maternity pics!
DeleteYou did a fantastic job! I can't believe you did a whole room that turned out like a magazine shot. You must be very patient and persevering.
ReplyDeleteThanks, Michele! That makes me feel great, but it is far from being magazine ready...especially if it's shot in HD. ;)
DeleteThat is fabulous! I would love for you to share this (and any other house projects) at my "May House Par-tay" at www.cheapcraftymama.com!
ReplyDeleteThanks so much!
DeleteThat's amazing - I saw a tutorial similar to this on the Nate show yesterday... I think I'm gonna have to try! Awesome job! Would love to have you join in on my linky party @ stringtownhome.blogspot.com! Have a great week!
ReplyDelete-heather
Oh, you mean my boyfriend Nate? :)
DeleteYou rock!! This is amazing and it looks absolutely beautiful!! We're so glad you joined us for "Strut Your Stuff Saturday." Thanks and come back soon!! -The Sisters
ReplyDeleteThanks Sisters and thanks for hosting!
DeleteI've wanted to use this design for a while but it looks like so much work! You did such a beautiful job. I featured it this week!
ReplyDeleteWow! Your wall is gorgeous! Thanks for sharing!
ReplyDeleteI really love this! Your wall looks so good. I've been considering stenciling my powder room - it's small and blah. Thanks for the "motivational pictures." ;)
ReplyDelete